If you are the type that whiles away your hours attending work culture seminars and inventing ever more inclusive code-of-conduct documents or wall-slogans proclaiming company values, you may take offence at my elaboration, which is precisely why you should read on. On one Friday afternoon, not so long ago, my boss decided that it would be a good idea to celebrate another colleague's ethnicity by Walking Like an Egyptian to the song of the same name by the Bangles. Unlike the band, he had not the hair and unexpanded mid-riff, but gave it a decent tilt. I was celebrating my first win (a $50K flood study for a town in regional NSW, thank you very much) with a glass of unsullied Talisker Single Malt at my desk, and asked my Egyptian colleague, as both the object of the boss's exertions and in his capacity of being a leading light in the company's cultural committee, what he thought. His reply, "Go f*** yourselves, I'm off for the weekend", was well received by all, including my boss. Now, I'm sure that the Politically Correct Thought Police would consider this a scenario worthy of its most serious attention but, as I mused into my deliciously aromatic whisky glass whilst pausing between emails, context is everything. In any case, I believe that the Politically Correct Thought Police are probably more worthy recipients of my colleague's admonition than I.
The latter is another episode in the seemingly never-ending saga of my recalcitrant keel.
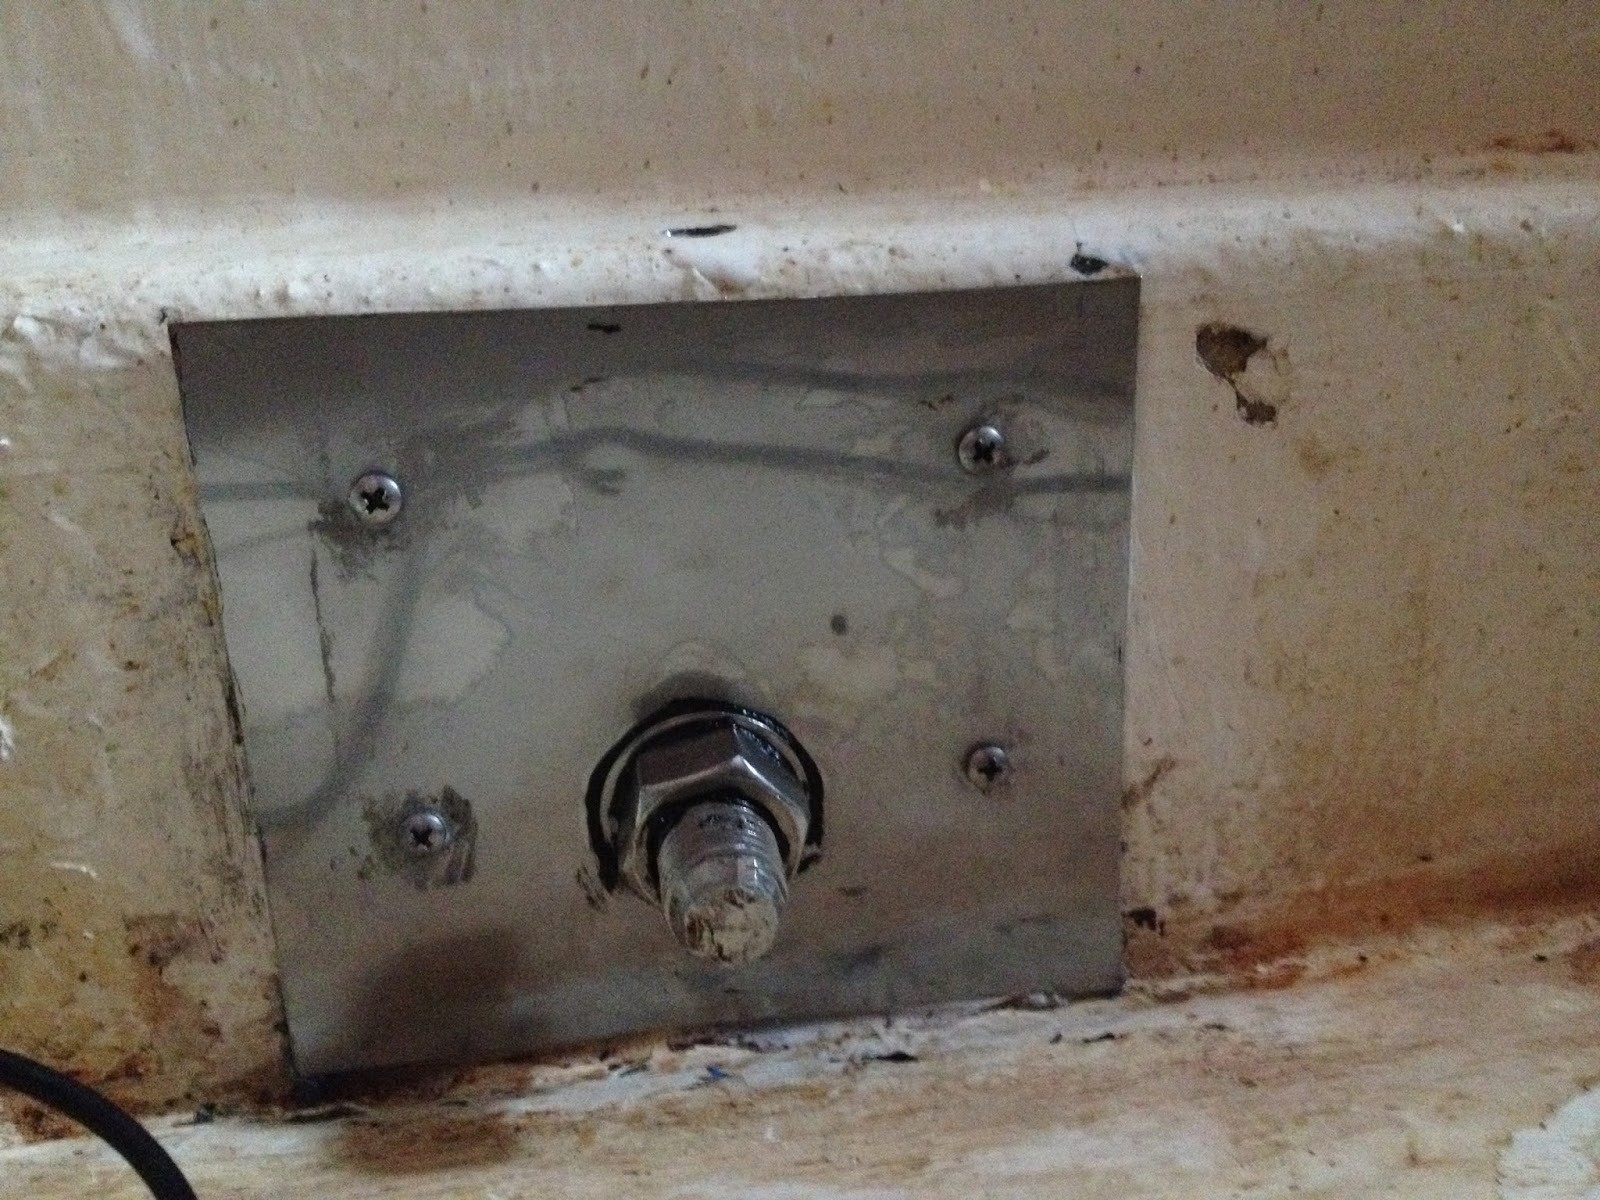
As readers of this blog might well know, my keel swings on an M20 stainless steel bolt or keel pin. The bolt passes through both sides of the keel box, which sandwich the keel in between. The keel comprises about 210 kg cast steel, and exerts considerable forces on the keel pin, especially when it is levered up into position for retrieving the boat (replacing it) onto its trailer. The keel and pin were up the task, but the holes in the sides of the keel box were not. That was probably because they were simply drilled through the timber keelson beams either side of the keel box, and thirty five years of heavy wobbling had worn the holes into ovals, which then leaked.
I had thought that I only needed to inject copious quantities of Sikaflex (which starts out as a sticky goo, and sets into a rubbery solid) into the bolt-holes to seal them. At the end of my last day-sail, the bucketful of water I bailed out from the bilges proved me wrong. The day sail was, in fact a Sunday afternoon race around Green Island. I started well before everyone else, and finished well after them, but the miracles of handicapping awarded me a bottle of wine for third place, which compensated my mood greatly after mopping out my very soggy bilge.
Having taken sage advice (from an experienced bloke with another old trailer-sailer), I decided on a proper fix for the dripping keel pin bolt-holes. This comprised taking out the keel pin, coring out the timber around the old bolt holes, placing pre-drilled stainless steel plates over the holes, replacing the pin, filling the void with epoxy resin, and sealing it all up again.
The stainless steel plates took a couple of weeks to fix up, mainly because I asked a colleague to cut the sheet and drill the 20mm holes as a favour (i.e. unpaid). The stainless sheet itself came from Bunnings, but I was reluctant to get an expensive 20mm cobalt drill bit to drill the two holes needed in it. Because it was a favour, the plates took over a week to come back to me, but they were properly cut and drilled.
Back to the boat, I found that a 40mm core drill did a good job of getting through the GRP outer layer and removing the timber from the keelsons. Some of the timber came away as black crumbs, which was not a good thing, so I kept removing it until I got to some competent timber. After trying various methods for cleaning out the hole, I found that a small diameter wire brush on my power drill did a good job, especially in removing the black, crumby wood. I did the starboard side first, allowed it to set, and then did the port side second.
I also didn't want to bond the keel pin to the epoxy, because, at some point, I would have to remove it again. I needed a tight fit, and decided on wrapping the bolt with parcel tape, sticky side out, because it was thin and impervious. This proved to be tricky because the length of bolt shaft available for parcel-taping was only marginally wider than my fingers, and because of the tape's penchant for picking up all the loose bits of dirt it could find in the vicinity.
Finally, I drilled two 12mm diameter holes vertically through the keelson beams through which I could pour the epoxy resin.
A quick note on the epoxy resin; though it was viscous, it had no surface tension. In layman's terms this meant that it oozed slowly, but easily worked its way into the tiniest holes and cracks. Though this is a good thing for filling all the voids it could find in the timber keelson beams, it also meant that it oozed through the masking/painter's tape I'd stuck around the steel plates to try to keep the epoxy in the cast. I even got some drips in between the keel box and keel, which I only discovered later in the form of a small puddle atop one of the members of the trailer. My 12mm vertical holes proved their worth in supplying a reservoir that kept the cast topped up as some of the liquid epoxy escaped from the sides and bottom.
After leaving the boat a week, I returned, cleaned up the tape and escapee epoxy and launched the boat. Thankfully, the big drip had been reduced to the tiniest smidgen, which I then fixed up by stuffing the head and nut of the keel pin bolt with liquid Sikaflex before tightening the bolt for one last time, or so I hoped.
I took advantage of the boat being off the trailer by replacing the bunks. The old bunks had come with the trailer, and were cut in a semi circle, but they didn't fit well, which meant that the weight was concentrated on one of the ends. I cut my new bunks to cradle the hull and allow the boat to slip off the back during the launch. Better cradling meant less stress on points of the hull if and when I finally got to transport the trailer sailer some distance by road.
The new bunks were made from one 40*190 treated pine beam, topped off with teflon strips. I got the bunks in place, but decided against drilling the 12mm holes to fix them because the rain and my chorded power drill made for quite a hazardous combination at the open boat yard where I was working.

Austral 20 keel pin renewal, showing new stainless steel plate starboard side. The Sikaflex is just visible as the black goo around the washer
Austral 20 keel pin renewal, showing new stainless steel plate on port side. The Sikaflex is just visible as the black goo around the washer. Also the 12mm filling hole is just visible in the keelson beam vertically above the keelpin bolt.

Austral 20 trailer showing new bunk on port side (front of boat to left)


Thanks for your blog. As an Englishman now residing in SA and having just bought my 1st boat an Austral 20 your blog was both entertaining and scary. I am just about to take it sailing for the 1st time so will find out what is wrong then. By the way do you know where the water tank is and how you fill and empty it.
ReplyDelete