Episode 30 - Diesel Engine Part 1

For the last year, the biggest question for me, as far as the boat was concerned, was what to do with the diesel engine. Should I recondition it or replace it?


The engine had slowly dripped oil since I had bought the boat, a Cavalier 28 called Bolero, in October 2019. It was a known problem and, rather than being fixed, it had been accommodated by placing a paint tray under the engine to catch the drips. Last Christmas (2020), the engine began to slowly drip diesel fuel. Again, I accommodated the problem by turning off the tap to the fuel hose after every trip, and emptying the paint tray under the engine at more frequent intervals. 


The actual leaks themselves could not be classified as an emergency; diesel fuel is not as volatile as petrol or gas, and it is not easy to light it, but it is not good to allow the situation to continue. More importantly, the smell and the worry of growing puddles of flammable liquids down below kept the Admiral off the boat. Something had to be done.

The engine was a single-cylinder Bukh DV10 LMSE with an external flywheel. As far as I could determine, it had been installed in the boat when it had been built in 1984, so it was almost 40 years’ old. I was faced with the following options.

OPTION 1 - Do Nothing and sell the boat

Pros: This is, obviously, the cheapest option with the added potential of inflated prices in the market as folks spent their money on COVID toys, including boats.

Cons: This would leave me with no boat. The inflated market meant that I would need to spend more on a new (used) boat, with the risks that the new (used) boat would have its own list of expensive and difficult problems. In any case, Bolero, is a nice boat with a reputation for competing well in races and it is perfect for what I use it for - mainly day-sailing in Moreton Bay with family and friends. It would be difficult to replace.

OPTION 2 - Replace the engine with a new engine

Pros: There would be no question of the engine problems being fixed, including the replacement of the rats’ nest of wiring that had evolved around the current engine. The new engine would be an upgrade from my current 10HP to something with a little more power, and would come with a ready supply of replacement parts. I got quotes for two engines that would fit my current drive-shaft and propellor

Nanni N2.14 - about $9600, including GST, engine, mounts, exhaust elbow, wiring and controls. The N2.14 is a two-cylinder 14HP engine with a heat exchanger

Beta 16 - about $9800, including GST, engine, mounts, wiring and controls. The Beta 16 is a two-cylinder 16HP engine with a heat exchanger.

NB: When choosing a new engine, you need to take the propellor into account. The style and pitch of the propellor needs to be matched to the working or maximum revolutions per minute (RPM) of the output. In my case, the propellor had been designed for the Bukh, which spun at a maximum of 3000 RPM. Because the boat came with a worn flappy, folding propellor, I replaced the propellor and shaft in 2019 for about $1500. The Nanni and the Beta would both spin up to 3600 RPM, which was still within the performance curve of the new Bruton folding propellor, and I was loathe to replace the prop with another replacement.

Having got the prices for the Nanni and Beta, I “rounded up” the budget to about $15K with a generous allowance for unforeseen work, which might include major surgery to the engine beds, slipping and specialist trades. I found this difficult to justify, as it was approaching 3/4 of what I had paid for the boat (in a private sale). As a comparison, I recently noticed another Cavalier 28 for sale with an asking price of $40K. 

Cons: This is, obviously, the most expensive option. There were also residual, unavoidable risks in fitting the new engine to the boat, though the wrights would do a proper job.

OPTION 3 - Repair or recondition the Bukh

Pros: Likely to be cheaper than a new engine with fewer risks of fitting it to the boat.

Cons: Replacement parts would be difficult to find. No increase in power (it would stay at 10HP). Risks of finding un-fixable problems.

Regarding the power, I thought it would be nice to have a little more grunt. But, the current engine was capable of 5 to 5.5 knots on flat water (e.g. getting in and out of harbour, and motoring on calm days). The previous owner had claimed that it would do 3.5 knots into a chop with a dingy in tow. The latter case would not be comfortable or pleasurable, but it would likely be the worst conditions I would sail in. Incidentally, I found that maintaining a clean bottom and a clean prop makes a big difference to boat speed, and for about $130, I could hire a diver to give the bottom and prop a scrub. There is more than one way to skin this particular cat.

The Bukh DV 10 LSME is cooled by direct salt-water injection, meaning that it sucks seawater straight out of the sea, circulates it around the engine-head and injects it into the exhaust elbow. It has no heat exchanger. There was no way of telling what damage had been done to the internal galleries around the engine-head by hot saltwater and calcium deposits.

Bukh engines are also remarkably primitive; deliberately so to increase their reliability for the lifeboat engines that Bukh manufactured. The Bukh DV 10 LSME has an external flywheel and mechanical injection. This means you can hand-crank the engine and run it with no electrical inputs whatsoever. The flywheel has a fitting for a starting chord. As an engineer by profession, I am instinctively drawn to the as-simple-as-possible solutions.

The Bukh DV 10 LSME is a rare beast, nearing extinction. Only about 100 or so ever built and it is now out of production. As I was to find out later, the number of replacement exhaust elbows has dwindled, and I was lucky to find one of only two known replacements in the Southern Hemisphere.

The remaining risks with this approach were to do with the engine beds, which looked shonky, the wiring, controls (which were well-worn) and peripherals, such as the exhaust elbow.

OPTION 4 - Replace the diesel engine with an electric motor

Pros: Quiet engine with no smelly oil or diesel fuel.

Cons: Cost. Although an equivalent electric motor would cost about the same as a diesel motor (say $8K), the batteries would cost several hundred tanks of diesel fuel. My current diesel consumes about $3 to $4 of fuel per hour. It might even lose more fuel to leaks than it burns. I would need about $5K to $7K of battery for each hour of electric ‘steaming’, and would need to upgrade the electrics from a 12V to 48V, which is well beyond my current capabilities. Furthermore, there remain safety concerns about getting trapped on a lee shore with flat batteries. It can be done, but the technology is still being developed. If you need to know more, I suggest you watch the Sailing Uma Youtube channel.

NB The term ‘steaming’ is obviously of historical origin and generally means propelling a sailing boat by using the engine. If it became anachronistic with the advent of diesel, it is now doubly so with the advent of electric engines.

Choose Option 3

The Bukh engine already started, ran and stopped nicely. Its only real problems were to do with its slow leaks, rather like an incontinent old family dog.  In the end, I found I did not have the heart to put it to sleep, so I chose to recondition the Bukh. 

If the reconditioning failed, requiring me to buy a new engine, I would at least have learned something about diesel engines, which, up to this point, were a complete mystery to me. Also, the process of removing the engine and taking stuff apart would likely uncover the hidden problems that would affect the refitting of a new engine. In any case, this seemed to be an incremental approach, meaning that I could work my way in slowly, and figure out the next steps as they arose.

The first thing I did was to get some video of the engine starting, running and stopping (see video below). This was proof that, whatever would happen next, I had started with a running engine.

The next thing was to remove the engine. Because of my earlier explorations, searching for the fuel leak, I knew my way around some of the engine, and had made life much easier by cutting a large removable hatch through the head compartment divider on the port side. However, it was dirty work taking off as many bits and pieces as possible, working with seized nuts and bolts, trying not to damage stuff and recording progress with notes and photos. It took a couple of mates to finally get the engine out of the boat. 

Lesson learned: When maneouvering a heavy lump of diesel engine around a boat, make a timber cradle or sled. I knocked up a pine cradle and strapped it under the diesel, and found it helped enormously. The big advantage is that you can put the heavy lump down on things like the floor, the companionway hatch, the combings, without damaging them. It also gives you useful hand-holds. Never attempt to manoeuvre an engine without a cradle.

I found that the forward starboard bracket had sheared completely, leaving the engine supported on the remaining three brackets. Half the forward weight, which included the heavy flywheel, was being supported by the starter motor leaning on the bearing stud. All the rubber bearings were in poor condition and the holes for the holding-down bolts were set into black, soggy timber.

I needed a mechanic willing to do the work. Diesel Works in Loganholme, QLD, said they would do it, and seemed undaunted that the engine was old and unusual. Without holding them to a quote, I asked how much and how long, and was told about $2K and 2 weeks. This was attractive, even allowing for some extra time and money. In the end it cost about $2800 plus GST and took about 6 weeks. The main causes for the delay were finding a replacement set of gaskets  (a single set of gaskets for this engine cost about $700 from the Bukh dealers in Sydney) and finding information, such as the torque settings for the engine-head bolts. The DV 10 LSME has an alloy engine head, so there was a greater risk that over-tightening the bolts would strip the threads than for a cast iron equivalent.

Lesson learned: Don’t assume that the mechanic knows everything about the engine. It would have helped if I had some some internet searching beforehand and handed over copies of the workshop manuals with the engine. Also, as it turned out, the Australian suppliers of the Bukh parts were more expensive and less well stocked than their competitors, The Engine Room in Auckland, New Zealand. In future, I’m getting my Bukh parts from The Engine Room.  If you intend to recondition your engine, find the manuals and a supplier or parts before dropping it off at the mechanics.

Diesel Works did a good job, though it was frustrating to be told, week after week, that it would be ready for collection the next week. The external casing had been badly corroded on the port side, probably because a split in the exhaust elbow had been blowing steamy sea water onto the engine block at this location (I would need a new elbow). Diesel Works took the engine apart, cleaned it up, sealed the gaps, and demonstrated that it ran. They also got some some parts working that had been seized for years, such as the manual fuel pump. The thermostat was broken beyond repair (I would need a new thermostat), and no fixes were attempted on the temperature and oil pressure gauges, which had ceased functioning long before the boat came into my ownership.

I got the new, shiny version of the engine home and started to measure up for the engine beds. I ordered a new exhaust elbow and thermostat from The Engine Room, for about $690 including tax, postage and credit card surcharge. I also bought new bearings and a coupling from Polyflex in Clontarf, QLD, for about $930 including GST.

The running total for the reconditioned engine is about $4700 including GST, and I have yet to get to the wiring and controls.

I am currently rebuilding the engine beds, which I will address in a new episode.


Bukh DV10 LSME after reconditioning


Episode 29 Depth Gauge

Bolero's depth gauge decided to not gauge the depth after getting back into the water from her January slip.

To be fair, the depth gauge unit was Navman Multi 3100 with an LCD screen, about 15 years' old. It did everything else nicely, including a read out of the battery voltage, but as it had given up the ghost in its chief purpose of gauging depth, it had to go.

Being a cheapskate, I looked for the cheapest working alternative. I wanted an in-hull fitting, because I don't like the idea of putting holes into the hull (or bulkheads) and because I did not want to slip the boat again, at $350 a pop at least, to fit a new instrument. For me, the most important thing was a reliable reading of depth in water shallower than about 2m so that I would not run aground, and so that I would know how much anchor chain to let out when needed.

Having succeeded in fitting a Lowrance Hook 2 5x to the inside of the hull of my Austral 20, I decided to downgrade to a Lowrance Hook 2 4x with GPS for my Cavalier 28, which had a similar solid GRP hull, although much thicker. The unit cost about $160. With my Austral 20, I simply glued the bullet to a puddle of epoxy resin in the bilge, and it worked nicely to give depth readings. 

One feature I like is that you can mount the head unit on a bracket screwed onto a bulkhead, so that it can be easily removed and stowed inside when the boat is unattended. This also saves having to cut a large new hole into the bulkhead, which not only weakens the structure but also presents another opportunity for water to get into the boat.

Initially, the 4x would not give a reliable reading of depth. To be fair on the Lowrance Hook 2 range, the transducers or bullets are designed to be mounted in the water on a bracket on the back of the transom as fish-finders. I was mounting mine inside the hull, and I was not interested in fish as much as the depth to the bottom, especially in shallow water. 

I had glued my bullet with FixTech 180 to the bilge a little forward of the previous and now-redundant through-hull fittings. The 4x gave some readings, but proved to be unreliable. The shallow-water alarm went off in the middle of the channel near Peel Island, which is maybe 8m to 10m deep. Thinking I might have mounted the bullet over some obstruction in the hull construction, I prised it off, damaging it in the process, and tried blue-tacking it into several alternative locations. With the blue-tack, the depth readings disappeared entirely and I thought I might have bought a dud.

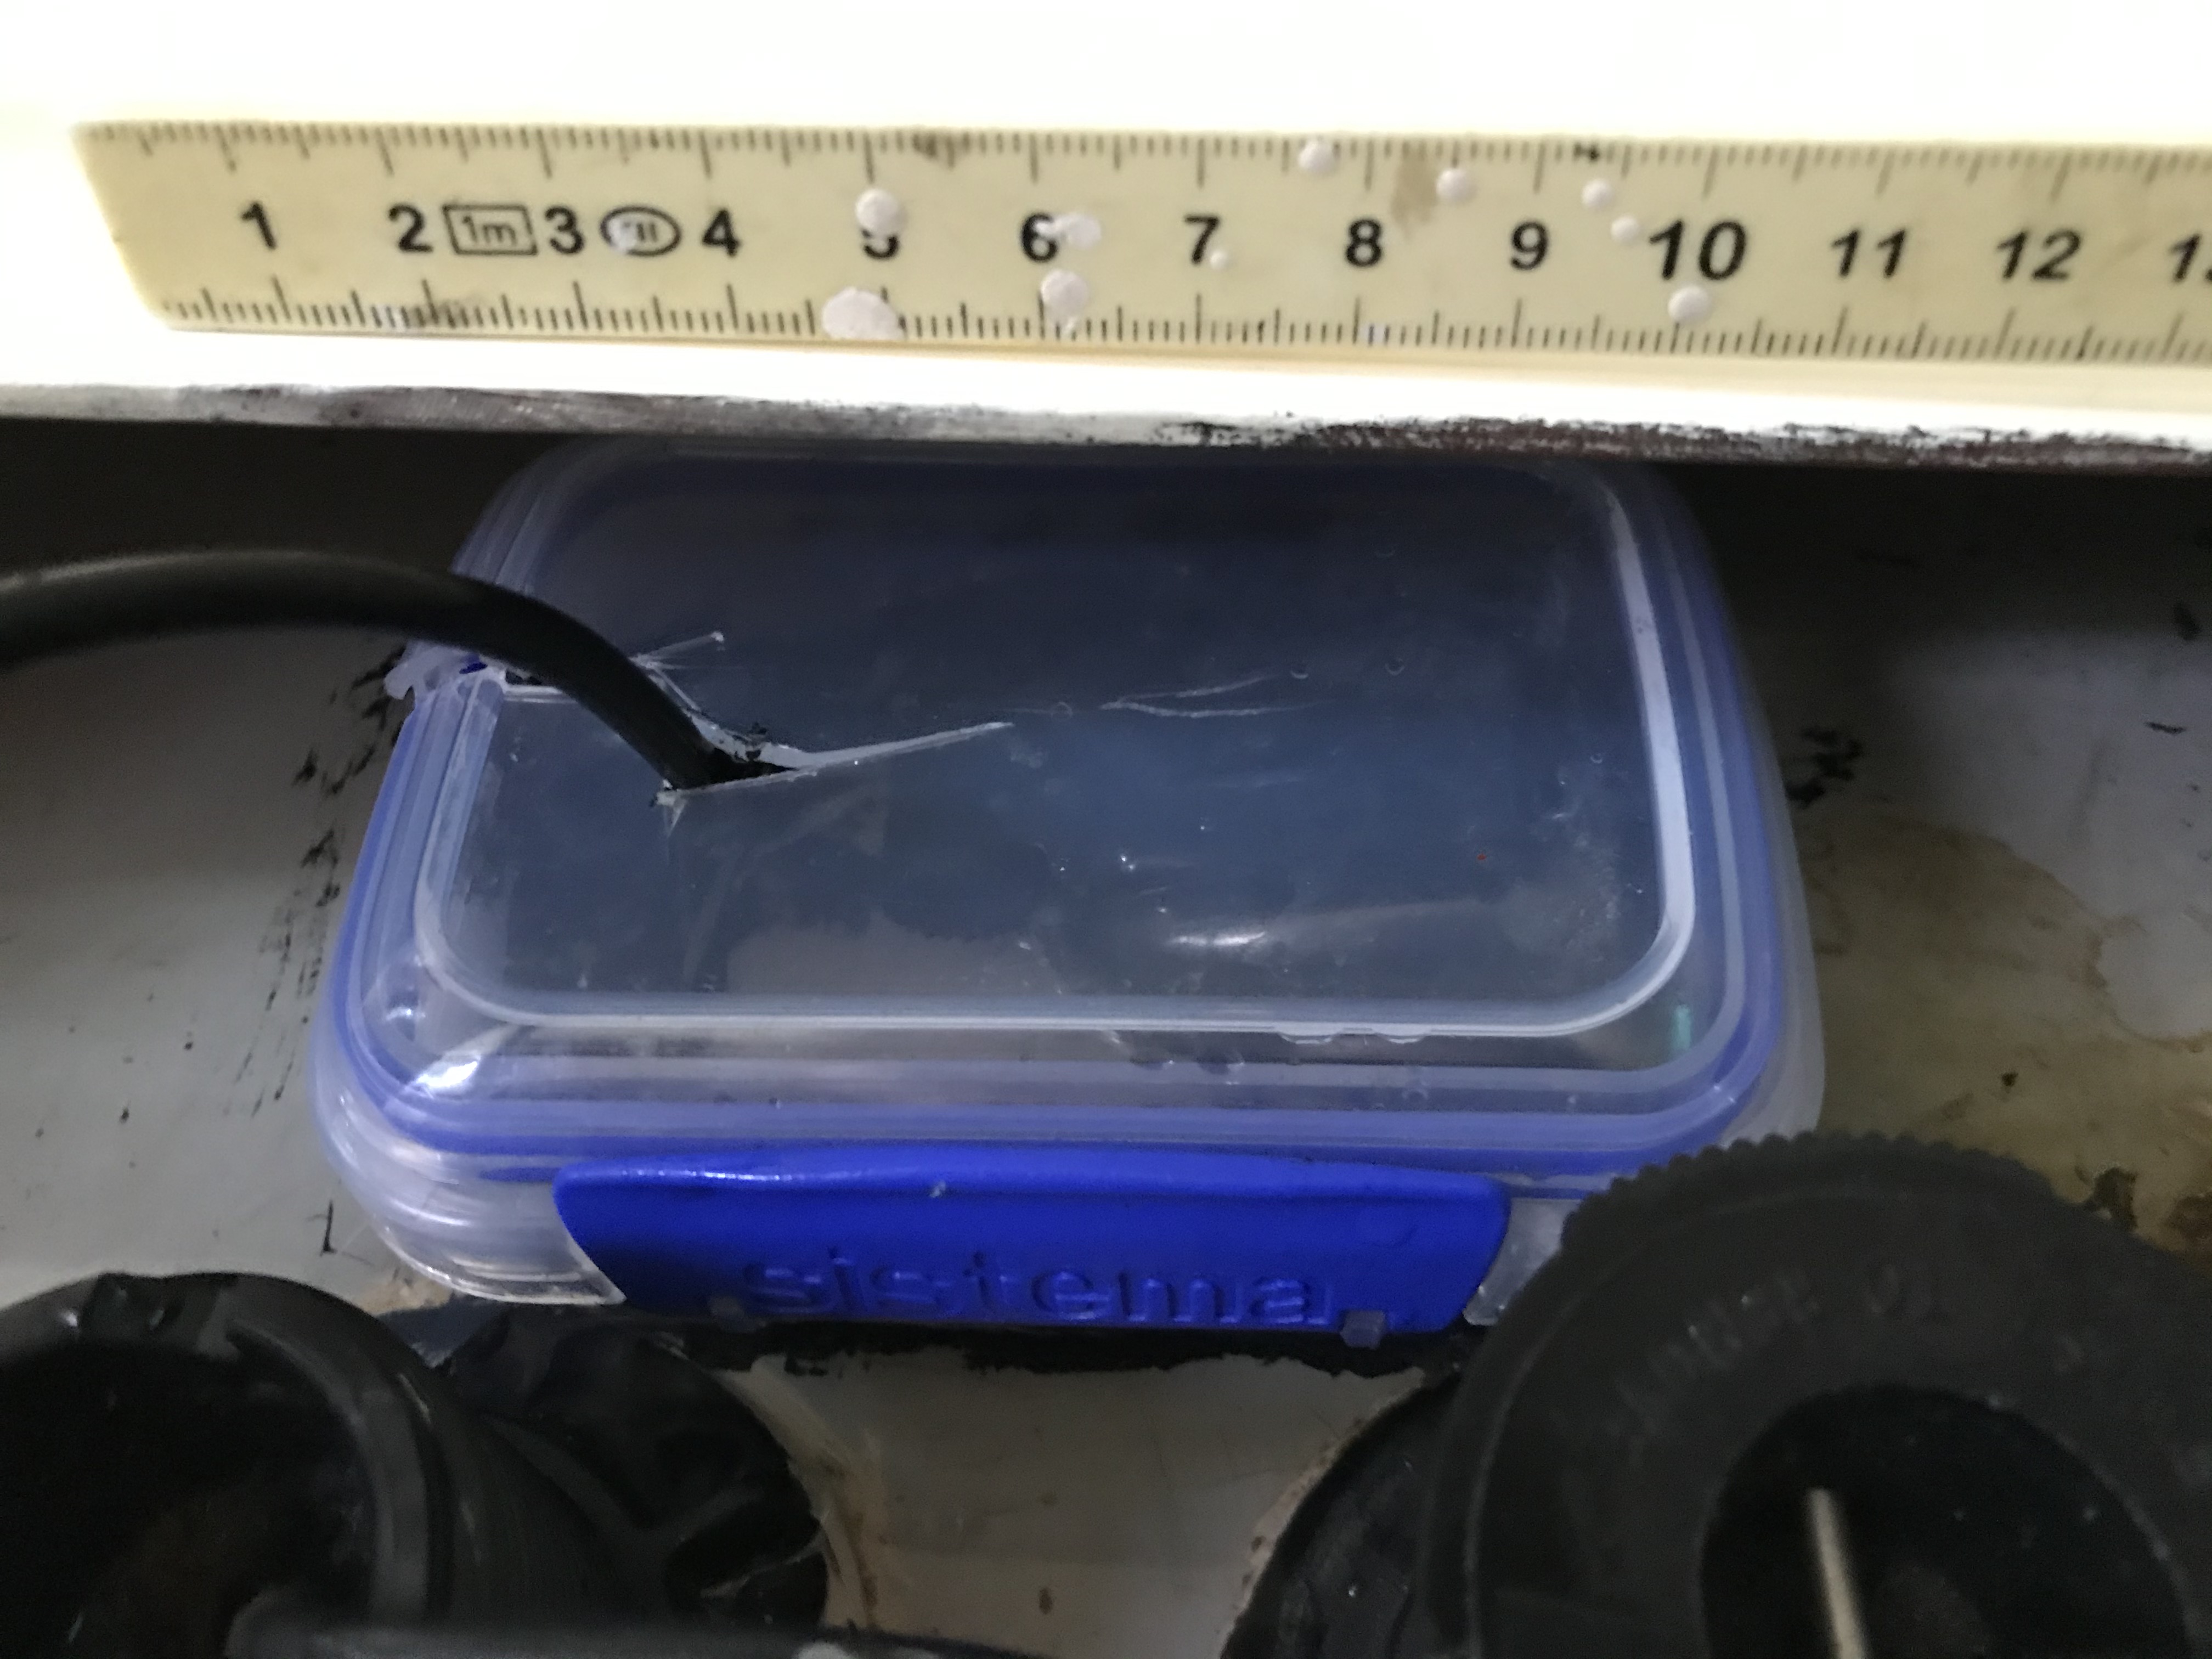
I phoned the shop I bought it from, Boating and RV in Tingalpa. Richard suggested I make a wet well inside the boat into which I should place the bullet. He suggested PVC pipe with a screw-on end, but I opted for cutting the bottom off an old Sistema clip-top food container and fixing it to the hull with FixTech 180. The clip-on top was needed to keep some water in the wet well when the boat heeled, and there was precious little room in the bilge for a larger screw-top arrangement.

I am happy to report that the wet well approach works well, and I got a nice, steady reading of a depth of 2.2m at my berth, which is what I expected (allowing for the bullet being about 0.3m to 0.5m below the waterline - I'll have to measure it more accurately). It also showed some fish, which were in no danger of being hunted by me at the time. 

So, to recap, you can use a Hook2 4x Fishfinder as an in-hull depth gauge subject to two important conditions;
  1. The hull you are shooting through is solid GRP construction, not a core-filled sandwich
  2. The bullet is placed inside a wet well inside the hull, which you will have to make, including a lid to keep the water in. A food container or sandwich box with a sealable lid will do nicely
The end result is ugly and agricultural. The plastic food container was more difficult to cut than I had anticipated. However, as we engineers say, "If it is stupid and it works, its not stupid".


Sistema food container with bottom cut off, glued to hull with FixTech 180
Wet well filled with water, bullet inserted and lid on (the lid needs to be sealed properly)

Depth gauge reading on head. Not easy to read in direct sunlight, but the head can be tilted down on its bracket.


Episode 28 Leaky Windows

In February, we were still expecting to go on our Big Trip through Canada, and across the Altantic to the UK. Since then, the COVID-19 crisis took hold and all our plans went south. However, at the time, I was expecting to leave the boat mostly unattended for 3 months, so decided to fix the windows to stop the rain coming in.

Bolero does not have a bilge pump. There is little clearance, only about four inches or 10cm, between the cabin sole (the floor that you stand on) and the bilge (the inside face of the hull), so there is not much room to fit a bilge pump. In any case, I think it is better to keep the water out, than to attempt to remove it once it is in by an electrical contraption that is doomed to fail at some point. Also, if I can see how much water is coming in, I can determine whether there is a leak worthy of my attention.

Bolero's windows had been leaking, and various previous attempts had been made at repairs, which was evident from the uneven application of silicon goo  and the odd-sizes of screw-heads used to fasten the window-frames to the cabin roof, including a couple of countersunk and oversized cross-head screws. The only way to find out how the things were constructed was to pull them apart, so I started by prising off the forward starboard window, which had been one of the leakiest.

Forward starboard window before repair

I found that the windows were constructed in two parts; the outer frame with the glass, which was screwed onto the outer wall of the cabin, and a simpler, inner frame which was screwed onto the inside face of the outer frame, thus clamping the headliner or inner lining of the cabin roof into place. The strength of the fit therefore depended on the strength of the purchase between the screws in the inner frame and the screw holes in the outer frame. Over time, most of the screws had worn out their holes, Galvanic reactions had reduced the aluminium into a white powder and many screws had become loose. The previous repairs had attempted to deal with the enlargement of the screw-holes by using larger and larger screws, which was obviously unsustainable.

Having got one of the windows off, the first job was to clean off all the old goo. The best approach was a wire brush. This got down to the bare aluminium and revealed the extent of the pitting and loss of metal at the screw holes. I filled the screw holes with JB weld and re-drilled them before repainting the frames. For painting, I used Dulux metal etch primer and epoxy enamel. It took me several attempts to get a presentable finish. Next time, I would use a pot and brush, not a spray can.

Before and after cleaning the goo off the outer frame
Close-up of pitting at screw-hole and attempted JB weld repair

Making a gasket for the outer frame with 1.5mm thick rubber strip glued into place with black Fixtech 180

Re-fitting the windows took several attempts, too. I made gaskets for each window using 1.5mm x 16mm black rubber strip from the Big Green Hardware Store, fixed into place with black FixTech 180.

Initially, I tried to re-screw the two frames back into place, but the screws did not get enough purchase into the GRP hull and aluminium frames for a strong joint. The inner frames were a little smaller than the outer frames, but there was sufficient metal to drill through, at an angle, from the outer screw-holes to the inner frame for a through-bolt. The resulting protrusion of bolts on the inside face reminded me of the bolts in the neck of the cartoon character version of Frankenstein's monster, but it was a strong joint. I might even use some of the protruding bolts to fix brackets for curtains. Also, I found that my rubber gasket was too thin, leaving some big gaps between the outer frame an hull. I doubled the thickness of the gaskets by adding another strip, and then attempted a dry-joint, which leaked when subject to a garden hose test.

There were a couple of things that I tried that did not work. In an attempt to arrest the Galvanic reaction between the aluminium frames and stainless steel bolts, I coated the latter with Duralac. However, the end result was plenty of yellow cake that stood out proudly against the freshly painted black frames. Ultimately, I cleaned it off and used nylon washers instead; there would still be some aluminium to steel contact, but not as much as otherwise and in less visible places. Also, I initially tightened the bolts with my impact driver. Impact drivers are good for getting seized bolts out, but they over-stressed my bolts when I put them back in, bending several where the nut or head had not seated evenly on the frame. I finally tightened the bolts gently by hand, which left a little for further tightening if needed. Placing and tightening the bolts was a two person job, and my wife patiently helped by holding the spanner on the nuts inside the boat whilst I got to work on the dome-heads outside the boat with my screwdriver.

In an attempt to seal the gap between the gaskets and hull I initially thought of using silicon grease. However, the dolt at the shop sold me silicon bathroom sealant instead, and I only noticed when I had applied it and it had started to harden. I did what I could to get it off again.I hate silicon bathroom sealant on boats - it is not strong enough to hold anything, there is nothing you can do to it after it has set, it is too yielding to remove easily with a knife or scraper and is impervious to chemical attack. That's why I use proper alternatives such as Sikaflex and the FixTech Range. The latter has a purpose-built clear UV resistant sealant, which worked well to fill my gaps.

It took a surprising amount of time to get the windows back in, from February to April, including several trips to the bolt shop by my wife to replenish my stock of bolts, washers and nuts and several attempts to re-paint the frames. When the final hose-test revealed no leaks, my long-suffering wife and I gave a relieved cheer. Subject to the COVID-19 travel restrictions, we could finally take the boat out again for the first time since slipping it in January.

Windows after replacement, starboard side
Windows after replacement, starboard side before placing dome-head nuts on the protruding bolt-ends

Episode 27 Broken Rudder

About a week before slipping the boat to replace the wobby prop, I decided to take some mates out on Moreton Bay with a view to getting a crew together for some races.

About half way between Green Island and Peel Island my mate on the helm told me that he had lost the steering. As you can imagine, this was quite a serious occurrence, and further inspection revealed that the rudder had broken about half way between the upper and lower pintles (the two hinges that connect the rudder to the transom). I called the Volunteer Marine Coast Guard on Marine Assist to inform them that we were having difficulties and then had a look. Fortunately, although the rudder had split, it had not completely parted at the break. There was enough material remaining on the rudder to allow us to lash the two halves together, rather like splinting a broken limb (I have never splinted a broken limb, but I have done some First Aid training). Although the top and bottom parts of the rudder wobbled in alarmingly independent directions, the whole had enough integrity to allow us to point the boat in the right direction. We limped back to Huybers (the marker post north of King Island), and then turned left for Manly Harbour, creeping along at about 3 knots and trying to nurse the boat over the stern-wakes of several stink-boats as they sped by. The prolonged use of the wobbly prop probably exacerbated the damage to the cutlass bearing as mentioned in my previous blog. I kept the Coast Guard informed of our progress, until we had tied up without assistance, and thanked them for keeping watch.

There is no good time to lose your steering, but losing it on a calm, sunny day, with the Coast Guard on watch a couple of weeks before a scheduled slipping is probably the best of a bad situation.

When we had got the boat slipped and the old rudder removed, we found that the timber core had rotted to a black mush. The rotted timber came out as a steady rain of black flakes from the cracks in the casing, which are just visible below the lashings in the photo below. Again, finding this before attempting some racing is better than finding it in the act.

Lashing on broken rudder
After the event, I asked the previous owner, who told me that the owner before him had replaced the original rudder with the bigger one that was now sitting on the back of the boat. The previous previous owner used to sail the boat hard (and had competed in the Brisbane to Gladstone races), and needed the bigger rudder to hold the boat on course. Fortunately for me, he had not thrown away the old, original rudder, which was now sitting under my back deck. 

The bigger rudder was made with a timber core and a GRP outer coat (which had kept it together as we limped back to Manly). Water had got into the core through the holes drilled for the fixing bolts, and the rot had hollowed it out until my mate put a little pressure on it in Moreton Bay. When you see the effect, you realize the importance of properly sealing holes in timber core construction. A good way to do this is to over-drill the hole, fill it with epoxy resin and then drill a hole through the resin at the correct size, thus ensuring that the timber core remains encased in GRP or resin.


Bottom part of broken rudder


Top part of broken rudder (upside down)


However, the finished surface on the original rudder was in poor condition.Because the anti-fouling had been out of the water for many years, it had cracked and degraded into a kind of soot. The gel coat had likewise been gouged and abused. I decided to sand it down, and went to work, perhaps unwisely, with a grinding disc. This proved to be very efficient at removing the old anti-fouling, gel coat and everything else right down to the GRP roving that covered the timber core and I ended up with a naked rudder, with the timber core clearly visible. Although this confirmed the competency of the timber core, it covered everything in my garage with a thick layer of dust to the express dissatisfaction of my wife. Having got the outer layers off, I then paid a yard-hand put them back on again, which he did very nicely. One unforeseen consequence was that the re-coated rudder was thinner than the original, leaving a small gap in the rudder brackets. This was fixed with some white FixTech filler.

Finally, I found that the Cavalier 28 came with two different types of rudders, depending on where they were made. The earlier models were made in New Zealand and had a Spitfire-wing profile. The later models were made in Australia and had the rectangular profile on my boat. The larger, replacement rudder was a one-off. I am quite happy with the original rudder that has now been reinstated. 

I am not sure I will get to the same kind of exertions that led the previous previous owner to fit the larger rudder. In any case, the larger rudder seems to be all about fighting the boat, rather than working with it. I don't have the race experience to make an authoritative judgment, but it seems to me that the energy spent in forcing the boat to do go against its inclinations could be better directed in making it go faster. his is about balancing the boat, as is whole science of itself.

Original rudder, before grinding


Original rudder, after grinding

Original rudder reinstated

Episode 26 Wobbly Prop

The first problem to sort out on Bolero was its wobbly prop. It was an issue that had been pointed out by the previous owner and the Surveyor in the pre-purchase survey. The prop (or propellor) was OK as long as I did not try to take it about 3 or 4 knots, at which point it would try to shake the transom to pieces.

It was an older style flappy-folding prop. Folding props will give you about half a knot over fixed-blade props because their blades fold together when not in use, this streamlining the flow of water and reducing turbulence. Also, they will not spin the shaft when sailing without the motor, which could reduce wear in the seals. The flappy-folders have blades that fold independently on a pivot pin, meaning that one could be up and the other down, as shown in the photo below.

However, folding props wear out, like all props, and can become unbalanced. When they get out of balance, the eccentric forces shake the back of the boat. Not only is this uncomfortable, it will actually damage seals and bearings. When we removed the prop, we found that it had destroyed the cutlass bearing, which is the part sticking out from under the boat just in front of the prop.


Old flappy-folder prop

Because I liked the idea of an extra half-knot, I decided to replace the flappy-folder with a new geared-folding prop. These newer designs have sprocket-teeth on the blades so that they fold symmetrically. They open up with the centripetal force of the spinning shaft, and close under the pressure of water as the boat travels forward. They work in reverse, because the centripetal forces are enough to open the blades against the water pressure, which tries to close them.

There is quite a science to fitting the right prop, including boat size, engine gearing and prop size. I took the advice of David O'Shea at Speed Propulsion and got a Brunton Varifold 2-blade prop, 14 inch diameter. As Murphy would have it, the one-inch drive shaft was a tad too short for the new taper. Apparently, there is now a US standard and a European Standard, but no one manufactures to the old Australian dimensions any more. So, I needed a new drive shaft as well. The prop itself was about $1760, and the labour, shaft, cutlass bearing and assorted bits came to another $1500, or thereabouts.

I got a little worried that the old prop had cracked the hull round the base of the cutlass bearing (where the protrusion meets the hull), but the only cracks I found were cosmetic, due to minor delamination between the GRP hull and bronze cutlass housing. 

I also got a little worried when we put the boat back in the water, and the new seal started to dribble. Left unattended it would have meant a sunk boat. You need to "burp" the seals after slipping by squeezing the air out, then they become dripless. Once I had done this, by means of considerable contortions over the engine block to get to the seal behind, it kept the water out nicely. It seems that one of the tradies had done something similar earlier, because a couple of the electrical wire connections to the engine had been knocked loose. I got them fixed up with some soldering and new spade connections - my first attempt at diesel engine electrics.

New Brunton Varifold Prop


Episode 25 Sold and bought

Having waited long enough to get over that uncertain period when one is vulnerable to buyer's (or selller's ) regret, I felt it was time to update the blog.

Firstly, I sold the Austral 20 in August 2019. I advertised it at $7500K, below its purchase price of  $9000. The price generated several inquiries, and the new owner was one of the first. I am glad  because I had some inquiries in the interim that I did not like. To me, a trailer-sailer is a trailer-sailer, and its chief attribute is its ability to sit on a trailer, out of the water, until needed, for long periods if necessary. You can also drag it to distant places at road-legal speeds rather than plodding up the coast at 6 knots, although I never got to take it on tour. So, when one couple asked if they could buy it and dispose of the trailer, I thought it would be wasted on them. The couple's plan was to leave it in one of the shallow, coastal lagoons up the coast where a retractable keel would be an advantage. Having spent considerable time and effort repairing the swing-keel, I could only imagine the mischief it would get up to, if it were to be left in the water for long periods of time, including the growth of undesirable organisms and rust inside the keelbox.

It was not long before I took the soon-to-be new owner for a test sail. Everything worked as planned, until the MPPT started to emit smoke in the middle of Moreton Bay. First came out white smoke and then black. The isolation switch then failed to isolate, and the smoke kept coming. I said, rather sheepishly but truthfully, "It's never done that before", whilst simultaneously unscrewing the battery terminals and calculating the costs of a replacement, including parts and labour. Graciously, the new owner accepted a $300 discount, rather than the offer of my dubious repair-work. He also took on the lease of the hard-stand at WMYC. I am pleased to say that the boat has not burnt to the ground (it would have been burnt to the water-line, had the other couple got it) and the new owner has taken it off on occasion, hopefully seaward rather than landward.

I then bought my new boat, "Bolero", a Cavalier 28, built in 1983. It was recommended by one of the members at WMYC as a nicely kept boat. The previous owner had to sell because of health issues, but he had sailed it regularly and kept it in good running order. It was a private sale, and we agreed on a price of $20,000, which is a below the advertised prices for other, similar boats. I commissioned a professional survey by Barry Colson (about $650) , which involved a half-slip (bout $350) and a few hours of poking, prodding, tapping and shinging torches into unreachable corners.

Having gone through it, I have to recommend this approach as a good way to buy a used boat. It's different from buying a car. When you buy a car, you might get on the internet, read the reviews, weigh up pros, cons and costs, decide on a model, then search for the best deal from a number of brokers or agents. Its an approach that does not work well with boats, because every one is different. Even if you decide that an Austral 20 or Cavalier 28 is the boat for you, you will find that there are good examples and bad examples, depending on how they have been treated. Many will be inter-state or international, so you would have to commit to a considerable journey just to eyeball the thing. The only way to find out about a boat, is to talk to the previous owners, or people who know the boat's history. The knowledge of the folks at the clubs is so valuable, because many of them know many of the other boats in the club, or in other clubs. The knowledge of the club members is is anecdotal and biased and this is where you need the service of a professional surveyor. My surveyor gave Bolero a good bill of health, and had good things to say about the build-quality, including some reassuring comments about the saddle-bolts used to keep the keel attached to the hull. It seems many modern production boats use only a single-line of bolts to save costs, which could be weaker than the saddle-bolts used in the Cavalier 28. Cheeki Rafiki lost its keel, killing all aboard, and I cannot imagine much worse that can happen at sea.

Buying a used boat within the context of a club or community has further advantages. Soon after purchase, the batteries went flat and would not start the engine, despite prolonged charging from the mains. The previous owner, and another gentleman from the club, fixed up the electrics for free, although I had to buy two new batteries (one starter battery and one house battery) for about $400. The battery merchant offered a 10% discount to club members.

Most importantly, Bolero was sail-able as soon as it was purchased. If there was one piece of advice I'd offer to people seeking their first (or second) boat, it is that they should look for condition, rather than size or make. A boat in good condition means you can sail it straightaway, rather than spending weeks or months fixing stuff before taking it out. There will always be something to fix but, hopefully, it will not be enough to stop you going to sea.


Episode 24 Keel locking pin

I don't like stuff that doesn't work. The locking pin for my keel had been annoying me for some time. Its not that it did not work, but that it did not work well.

My Austral 20 has a swing keel, which pivots on a pin near the front of the keel box. I had quite an adventure un-jamming the keel, and now it swings up and down freely.

The locking pin is a big bronze rod that locks the keel in the "down" position. It is located just aft of the keel, and is inserted into a hole in the side of the keel box, when the keel is down. Theoretically, the keel is heavy enough to stay down, but there is always the worry that if the boat gets rolled more than 90 degrees, the keel could swing up, changing the centre of gravity in the boat and resulting in a full upside-down-and-can't get-upright-again experience, which is something I'd prefer to avoid.

I had noticed that I could not screw the locking pin in. Also, when I grounded the keel (gently) it bent the pin backwards by tearing out the mounting screws. The problem, I deduced, was that the socket on the far side of the keel box was misaligned or blocked. The only solution was to disassemble the locking pin assembly. This was easier said than done because of the odd assortment of corroded screws, epoxy filler and plastic mounting plates that had accrued over the years following the attentions of previous owners.

The application of a drill, hammer, old chisel, much banging and bad language eventually got the components free. These are shown in the photo below, and comprise

  • The brass pin (1/2" diameter)
  • A brass ferrule on the near side, into which the pin was inserted (1" outside socket)
  • A brass socket on the far side, in which the end of the pin rests (1" outside socket)
  • A brass blank, to cover the hole when the keel was up, and so stop water from slopping into the cabin through the open hole.
  • Assorted brass and stainless steel mounting screws, most of which were totally destroyed upon extraction


Austral 20 keel locking pin components

When I got the bronze components out, I cleaned them up with wire wool. They came up like shiny old coins, as illustrated below.

Austral 20 brass ferrule and socket for keel locking pin, before and after  cleaning with wire wool

The original design had a clever feature. The head of the pin had an indented centre, and the blank had an embossed or raised centre; one for "in" and the other for "out", so you didn't need to remove either to check if the pin was in or out.

However, the weakness was that the screw holes in the ferrule and socket were too close to the centre,  and could be easily ripped out.

My suspicions were confirmed when I finally got the socket out and found that it had been filled with putty and then epoxied over. I have no idea why, except maybe to stop a tiny drip from getting into the cabin. The result meant that the pin could not engage the socket, so it was only held on one side. Any forward force applied to the keel would push the pin backwards and, because it was only held by three screws in weak screw-holes, would rip the ferrule off its mounting, making a horrid mess of the GRP and balsa core sides to the keel box.

My solution was to make up a couple of stainless steel plates, 100 x 100mm, to reinforce the mounts, and to provide a waterproof seal (like the plates I had made for the keel pin).  The hardest part was drilling the 1" diameter holes for the ferrule and socket, because the biggest metal drill bit I had was half the required diameter. Being unwilling to spend large amounts of money for a full sized 25mm metal drill bit, I decided to stitch-drill a ring of smaller holes around the diameter, and then file then out the remainder with my needle files. This was tedious, but eventually gave me the holes I needed.

The completed assembly is shown below. I have yet to fit it to the keelbox because I need to have the keel down to get everything aligned. Getting the keel down is easiest to do when the boat is in the water, which means I will have to relaunch the boat, which should happen next weekend.

And, yes, the holes for the locking pin are above the water line. (Think about what would happen if they weren't.)

Austral 20 locking pin assembly with stainless steel plates added. The stainless steel plates will be mounted either side of the keel box.


Episode 53 Corner Blocks

 This was probably the most complex piece of wood-working I have carried out on my Cygnet 20. I had previously made up some corner-blocks, w...