Showing posts with label keelbox. Show all posts

Episode 7 Extracting the keel and more rust

If you think that rust is a recurring topic here, you'd be right. I suppose I could rename this blog The Power of Rust and play an adapted version of Huey Lewis' The Power of Love. But I won't - you'll just have to imagine it.

Last time I described how I found the keel, but still didn't know much about it. Until I had extracted it, it remained an unknown large, heavy lump of rusted metal of unknown dimensions and dubious weight, sandwiched tightly between the side-boards that made up the keel box. I did know it pivoted about a fixed point near the front of the keel box, which indicated a keel pin of some description. All I needed to do, then, was knock out the keel pin and the keel would drop out. Wouldn't it?

I had just finished building the car port with two sliding beams fitted for a boat sling. The first task was to get the boat home (with the help of a friend, a Toyota 100 Series Landcruiser and a generous towing capacity) and suspend the boat in mid-air. Not having Yoda's levitational capacities, and not having any serious lifting gear, I used a couple of scissor jacks and a pile of free off-cuts from the timber yard bin at the nearest hardware store . To keep it suspended, I used my sliding beams and two sets of lifting slings and tie-down straps, all rated at 1000kg. The lifting slings were of a fixed length and the tie-down straps gave me some adjustment. I found that although tie-down straps are good at tying stuff down (hence the name), they don't have a lot of travel in them, so are less good at lifting things up. It was a case of lifting the boat up a little with the tie-down strap, getting some shoring in underneath, undoing the tie-down strap and taking in the slack, tightening the tie-down strap and starting again. The end result was getting the boat 600mm off the ground, which was just enough to extract the trailer from underneath and gave, hopefully, enough clearance to get the keel (of uncertain width) out. I also used a lot of foam padding, made from neoprene sheets and cable-ties to protect the hull from chafing.

Austral 20 on boat sling in carport before the addition of safety shoring under the boat
As the fore and aft of the hull are the kinds of smooth three dimensional wedge-shapes designed to allow the boat to slip through the water, they are perfect for slipping out of boat slings. So, I was careful to tie the straps together with horizontal ties running fore-and-aft, which stopped the fore and aft slings from creeping forwards and backwards respectively. The usefulness of these ties became apparent the first time I climbed onto the suspended boat and realised how much it could sway and wiggle. I didn't want it to wiggle out of its harness because the likelihood of getting it back in was slim.

The next issue was knocking out the keel pin. This came out fairly easily, with some persuasion applied via a claw hammer. But, the keel remained stuck. Curiously, the keel could still be pivoted around the keel pin hole, as if the keel pin were still there, but it would not slide out of the bottom of the boat. At least this gave me my first clear sight of the bottom part of the keel, even if the top part remained hidden inside the keel box. It had some rust, but didn't look too bad.
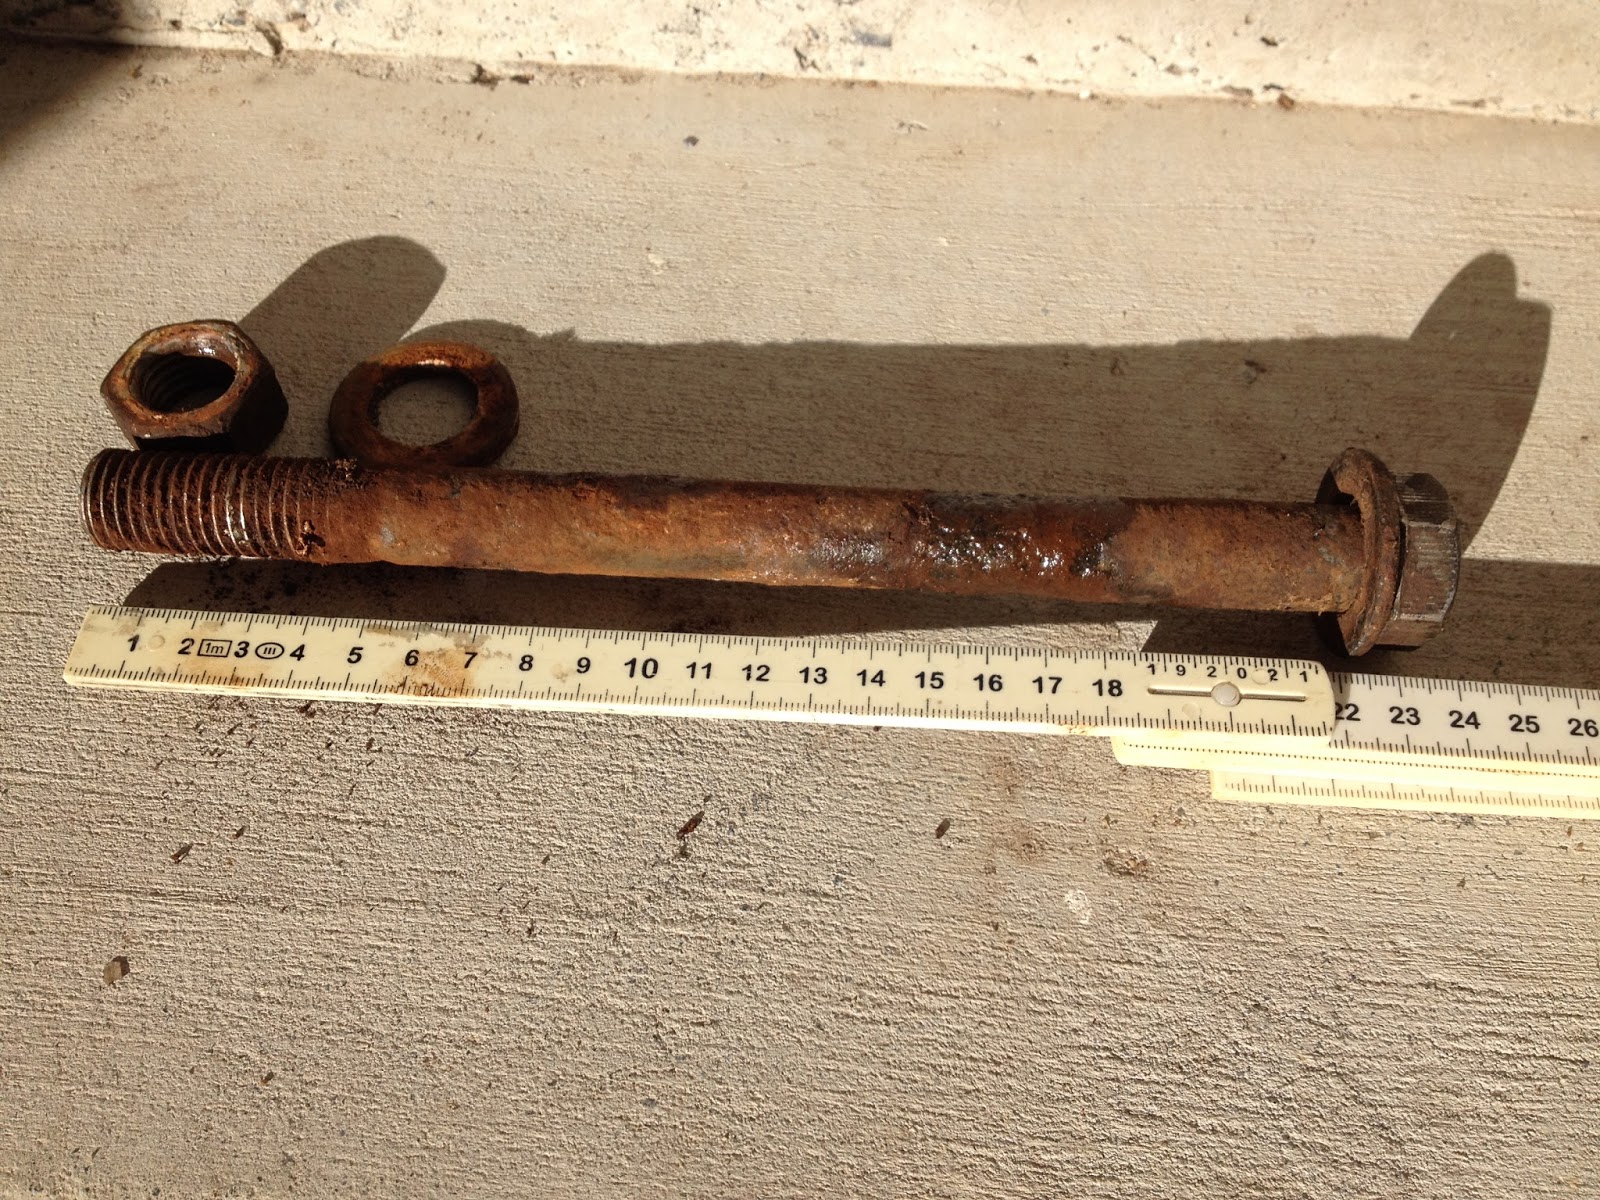
Austral 20 keel pin - 3/4" steel bolt


Austral 20 keel before removal
I tried hitting the keel with a hammer, but it didn't budge. I tried hitting it with a bigger hammer - a sledge hammer on loan from a friend - until a neighbour asked me to stop making a noise like I was hitting a massive metal plate with a massive hammer. I explained that that was exactly what I was doing, but I was getting nowhere and she had a point about the noise. So, I stopped and had a think. My wife wondered if I should take it to someone who knew what he was doing, but I decided to podger on.

There was something stopping the keel from dropping out of the bottom of the keel box. I decided the most likely culprit was rust. But, how could I get to it?

An alternative strategy to dropping the keel out of the bottom of the keel box was to lift it out of the top. There was the advantage that the top of the keel box was not as stiffly constructed as the bottom, so that lifting the keel would be undoing a wedge rather than tightening it. However, a full lift meant getting some (expensive) lifting gear inside the cabin and finding two points on the keel to safely attach to. I also needed to attach the lifting gear to something other than the GRP cabin roof. There was only one good point of attachment on the keel - the horn at the top of the keel to which the keel-raising line was attached via a shackle.

I struck upon a hybrid strategy - lift the top part of the keel out of the keel box and clean off the rust before dropping the whole thing through the bottom of the keel box. I found I could do this by using some scrap timber as a fulcrum and see-sawing the keel into position, locking it into place by using the boat's backstay to tie the top of the keel to the rear sliding beam in my carport. There was, fortuitously, a clear line of sight from the top of the keel, through the companionway to the beam. I also needed a few safeties to prevent the whole thing becoming a highly efficient guillotine at any of those critical moments when I had my body-parts in the direct line of swing.

Austral 20 - using the weight of the keel on a pivot to unlock the top part of the keel. To operate, pull the string...
After pulling the string ... the back goes down and the front goes up, unlocking it in the keel box. Jack up the back of the keel, relocate pivot further after aft and repeat ... until
... keel is fully dislocated but upright.

The final result got the top of the keel just clear of the top of the keel box, where I could get to the rust. As I suspected, there was plenty of rust on the sides of the keel, and it formed a number of "warts" on either side. I chipped away at the warts with a sacrificial wood chisel and attempted to saw off some of the rust-warts below the top of the keel box.

Austral 20 keel: top of keel levered out of top of keel box and suspended by rope attached to keel horn. Showing rust-warts on port side.
Austral 20 keel: top of keel levered out of top of keel box and suspended by rope attached to keel horn. Showing rust-warts on starboard side.

After chiselling the rust warts back as far as I could, I decided that, rather than lowering the keel gently down through the keel box, I'd cut the supporting rope and let it drop. I reasoned that I was substituting a 7 kg sledge-hammer with a 150 kg keel-hammer (it actually turned out to be heavier, as I'll describe later) to force it onto the ground. My first attempt failed. The keel got stuck in the keel box again. I had to lever it back into position, chip and scrape off more rust and try again. On the second attempt, the thing finally dropped clear of the boat and I gave a loud cheer. Actually, it was a rather muted cheer, because I'm English and have a very English sense of restraining one's emitions. It was if the boat had suffered a two year constipation, and I had got it to finally ... er ... deliver. The attached video shows this moment of triumph after five days' full-time travail. It might not be the most exciting video ever posted on the internet, but it was a mighty relief for me.


Looking back inside the now-empty keel box, I found that my earlier suspicions were correct. It was all about rust. Interestingly, the rust had formed rust-warts or nodes on the sides of the keel, and these had ground out grooves on the inside of the keel box. The tracking of the rust-warts in their grooves allowed the keel to pivot, but prevented it from dropping. There was nothing I could do about the grooves in the keel box, but I could get the rust-warts off the keel, and that is what I did next.
Austral 20 inside of keel box showing grooves ground into the sides of the keel box by rust warts on the keel. The grooves are a few millimetres deep and have worn through the white top layer into the clear GRP layer below.

Austral 20 inside of keel box showing grooves ground into the sides of the keel box by rust warts on the keel. The grooves are a few millimetres deep and have worn through the white top layer into the clear GRP layer below.

Episode 6 Finding the keel

The biggest problem facing me was having no idea of what I was looking for. All I knew was that the swing keel swung on a bolt (the keel pin) near the front of the keel box, and that it was becoming harder and harder to get it up and down.

Sensibly, you might suggest that I take a look at it, but taking a look was almost impossible. The keel was secreted in the sealed keel box with nothing but a small window at the front to show if it was up or down. When the keel was on the trailer, the under quarters of the trailer blocked the view from underneath; and when the keel was in the water it was, well, wet. Even if I had been game enough to go swimming under the boat (in the murky harbour among the Bull Sharks) I would not have seen much more than the edges of the keel. I even tried a borescope, but all that I could see was that the inside of the keelbox was narrow and filled with a large object that was, presumably, the keel.  I had to work with what I knew about the keel behaviour, and make some educated guesses, some of which, as I'll describe later, proved to be wrong.

Being over 30 years' old, the boat had no drawings and, so it seemed, no one alive who could remember how it was built. If you can imagine someone asking you what your spleen looks like, and you neither have access to Gray's Anatomy (or the TV series derivative) nor a desire to cut open your own belly with one of the knives in your kitchen drawer, you might sense the scope of my ignorance. It was like shooting in the dark with a gun that you'd only heard someone mention in a crime novel.

My wife, quite reasonably suggested that I take the boat to a boat mechanic. I decided it against it for a number of reasons, being

  1. I was out of work and had more time than money, and could not afford to pay someone else to do what I could do, even if I took four times as long;
  2. A boat mechanic would have to go through the same process of deduction to find what was there; and
  3. My belligerence, frankly, tempered by a more laudable curiosity to find out how the keel was constructed, what was going wrong with it and how it might be fixed.

But first, some history.

The keel had been getting harder and harder to lower and raise, and the problems started to manifest around January 2016. To start with, the no-name Chinese electric winch that winds in the cable that raises the keel seemed suspect, so I replaced it with a Ridge Ryder 1500lb (680kg) winch. That taught me about winches, but the keel still stuck.

I thought it might be the battery not giving enough "umph" to the electric winch, so I fitted a 20W solar panel on the rear handrail to trickle charge the battery between sailing trips, together with an Sunyo MPPT controller and an unfinished re-wiring project.  This rewiring project also needed a new bespoke fitted cabinet to house the new MPPT, switch panel, radios etc, which took several weeks to manufacture. This worked insofar as I grounded the boat whilst sailing around St Helena Island at low tide in February 2017, but all I needed to do was wind the keel up using my freshly charged battery, turn the boat around and sail off the sandbank that I had just hit.

Finally, in April 2017, the keel got itself well and truly stuck in the down position. Fortunately, my crew and I managed to drag the boat onto the concrete of the boat ramp, which must have pushed the keel partly up again, and then onto the trailer, so at least it was out of the water and ready to be transported somewhere for some attention. Also, we had just finished building a car port at home, which included some cleverly constructed sliding beams under the ceiling for the very purpose of hoisting the boat off the trailer for maintenance. I decided to seize the opportunity to un-seize the keel.

The first hurdle was getting into the keel box, which was harder than it should have been. Not knowing how the keel box was constructed, I thought it was a relatively simple case of getting the table off. The table is a plank of pine fixed to the top of the keelbox. Not only does it provide something to dine off, it stops any water in the keelbox from entering the cabin. Also, it serves as a horizontal prop between the compression post and the companionway bulkhead that helps to stop the keelbox from buckling under the load applied by the winch when it winds in the cable to raise the keel. Very clever.

What I did not realise was that the compression post sat directly on the top of the keelbox, and I ended up smashing the table to get it off. The engineer in me objects to breaking things in order to maintain them, but there you are. I thought the compression post passed through a hole in the keelbox onto a stainless steel plate (part of the sheave assembly) below, and all that was holding it in place was the excess from some liberally applied varnish and various layers of silicon and other goo smeared along the top of the keel box to seal it. By the time I had chiselled and cut and levered the table up, I realise that I had actually made the hole I thought was there and I had split the table along the grain, as the following photo shows. There was nothing for it but to take a saw to the remains and think about how to replace it all.

Austral 20 keel box from the starboard side. The table has been levered off keel box. The compression post is still in place, standing on a stainless steel plate that is part of the keel-lifting sheave assembly
Austral 20 keel box, from the front, with table partly removed and lodged part way up the compression post. The keel-lifting sheave assembly is at the front of the keel box, and the photo shows the upper plate and upper pulley wheel. The keel cable passes from a shackle on the top front of the keel, through two sheaves (pulley wheels) on the sheave assembly to the winch located towards the rear, behind the rear cabin bulkhead. The wood chips on the floor are the result of my exertions in getting the table up.

Austral 20 keel box with table fully removed, showing the compression post standing on the upper plate of the keel-lifting sheave assembly.
This destruction did give me my first look at the keel, or at least the trailing edge of it. I think the blue and brown colours are quite beautiful in the photo, but they spelled out one word loud and clear - rust. When steel rusts, it expands to about 18 times the volume of the parent metal. What I suspected was that the sides of the keel had rusted, and it was the expanded rust between the sides of the keel and the inside face of the keel box that was causing the keel to jam. It was a snug fit, though. You couldn't even get a sheet of paper between the sides of the keel and the keel box. There was only one solution - get the boat on the hoists and get the keel out.

Austral 20 swing keel in keel box, from above, showing signs of rust. The keel box is about 40mm wide and the keel fits snugly inside.

Episode 53 Corner Blocks

 This was probably the most complex piece of wood-working I have carried out on my Cygnet 20. I had previously made up some corner-blocks, w...