Episode 43: Small things that make big differences

Today was my second trip as a solo sailor. I hasten to add that I hope others will join me, but I would rather reduce the number of witnesses to the obligatory rookie mistakes in my early trips. 

Last Sunday, I poked my nose out of Manly Harbour, saw the dark rain band approaching and decided to head back rather than trying to find clear skies on the other side. This proved to be a wise move as the clear skies did not arrive until about Tuesday. Today I got the sails up, with a single reef in the main, and ventured as far as Green Island. The wind then veered south and decided to get boisterous. Thanking my single reef, I furled the jib, turned tail and scurried back to Manly harbour at a fair clip.

Heading out today, I found the boat easy to sail. The Cygnet 20 has less gear than my other boats; no winches, no travelers, not even a backstay. To tack, you simply push the tiller away, let go of the job on one side and bring it in on the other, whilst simultaneously regaining control of the tiller. The fewer adjustments might leave you behind a more tune-able boat but, as the boat trotted along at about 6 knots today, it did not seem to miss all the fandangles of my previous boats.

Last Sunday, I found some of those little things that made a big difference. I accidentally lodged the safety circlip under the mast as I stepped it. The mast of the Cygnet 20 is mounted in a tabernacle on the cabin roof with a hinge about eight inches above the roof. This arrangement stops the mast squashing the gaff and boom against the cabin roof when it is lowered, and it reduces the mechanical effort to lift the mast. When raised, there is a half-inch safety pin that goes through holes in the base of the tabernacle and a corresponding hole in the mast. Normally, it is a snug fit. This time, it jammed. I mistakenly thought it was because it was a new boat, so I persuaded the safety pin through the holes by tapping it with a pair of pliers (not having a hammer handy). When it came to putting the safety circlip into the safety pin, I realized my mistake – the circlip was jammed under the mast, pushing it upwards so that the safety pin obstinately resisted my attempts to insert it. I had to borrow a proper hammer and drift to get the safety pin out again so that I could re-lower the mast, retrieve the circlip, re-step the mast, re-insert the safety pin (it went in much more easily, this time), and fit the circlip. The photo below shows the tabernacle with the safety pin inserted from the left and it is almost hidden. If you squint hard enough, you might just be able to make out the tiny circlip on the bottom right of the tabernacle, where it should be. Such a small thing took about half an hour to put right.

Bungs. Always check that you have screwed them in before launching. I launched today before I had screwed them in. I remembered just as I was maneuvering the boat off the trailer. It only cost me about 10 minutes to get the boat back on the trailer so I could pull it up the ramp, screw the bungs in and relaunch. 

A four-step step ladder saves heaps of energy and time. With a trailer sailer, the time and energy spent launching and retrieving can be measured by the number of times you climb on and off the boat on its trailer. Not having the climbing agility of an African leopard or a gibbon, I have found the ladder invaluable. It also enables me to reach the top of the mast, when it is lowered, to fit the covers.

Incidentally, I received a couple of compliments on having the best covers in the fleet. I ordered them with the boat, and Tim the Trimmer did a truly excellent job. I must have been in my teens when I learned the value of good covers. I was playing guitar in various youth groups and bands and always coveted the better instruments. One of my guitars was a cheap Spanish, and as it slid off my shoulders, onto the back wheel of my push-bike and onto the road with a sickening twanging noise, I came to the realization that even the nicer guitars get pounded when they don’t have good covers or cases. Ever since, I have learned to reduce the budget for the instrument so that I could afford a hard case, and so preserve the paintwork and varnish. The boat was a huge step up in budget from my early guitars, but the principle of good covers remained. Hopefully, they will protect the boat from the Queensland sun. I had wondered if the additional $5000 or so was worth it, but I don’t doubt it now. They fit like a glove, and they are much, much easier and quicker to fit than the rubbishy tarps on my previous boats. Less time and energy wrangling covers means more time and energy on the water. Maybe we can count the covers as a not-a-small thing, but they make a big difference.

In future, I hope to take my wife out. And, maybe, our new dog, Bea, who is a Golden Retriever, now 20 weeks old and teething. My favorite photo of her is shown below. She will not go out on the water until she improves her body coordination.

Sandpiper's tablernacle, seen from the front. The tiny circlip is at the base of the mast on the right

Single reef outbound from Manly


Sandpiper's fabulous covers

Bea learning where the ground is

Episode 42 Naming and Launching Sandpiper, my new Cygnet 20

 It has been a long wait, about 18 months since I paid my deposit to Blue Water Cruising Yachts. The build started in September, due for completion before Christmas, but problems with getting the trailer certified pushed delivery back to January. In late January, I drove from Brisbane to Newcastle  and hauled the boat back. On the journey, some folks complimented me on such a handsome boat. How did it go, they asked. About 95 km/hr, I said as it sat on its trailer at a roadside stop.

Unrelated to the boat, except as a means to haul it, I found something about my Ford Territory that I did not know before. It seems a certain tyre mart with Mart and T and Jane and Bob in its brand name, did not know it either. When replacing the tyres on an all-wheel-drive, make sure they are the same brand. Not just the same type, but exactly the same brand. I had arranged for said tyre mart to replace two of my tyres with the same tyres I already had. Something went wrong in the booking and when I turned up on the Saturday, they said they didn't have them. No problem, they said, we will just fit these more expensive tyres to the front and leave the 3-month-old good ones on the rear. When I drove off, there was a thudding that felt like I was hitting a speed hump every second or so. So, instead of leaving on the Sunday, I drove home and returned the car to the tyre mart on Monday morning. The tyre mart checked everything but could not find the problem. Satisfied that my wheels would not actually fall off on the 1700 km round trip, I ventured forth and found that I could avoid the thudding if I abstained from cruise control. I got back safely, with the boat, and asked Moreton Bay Ford to diagnose the problem. A big shout to Moreton Bay Ford for looking at the problem and diagnosing the power distribution was the problem - the different brand tyres were tracking just differently enough to trigger an attempted power distribution, hence the intermittent thudding. The tyre mart swapped out the "wrong" tyres and the thudding stopped.

My experience of registering the boat and trailer in Queensland is best described as a necessary evil. I don't envy the clerk as he tapped various numbers and codes into the computer, but it was a tedious 60-minute wait to get charged the registration fees of $513. And, this was after I had to pay a Queensland inspector $220 for a trailer safety certificate and HAVRAS because the NSW certification did not count. Obviously, what is safe on the roads in NSW is not safe in QLD. That, or the bureaucrats found another way to justify their jobs. With the registration, I could tow the boat from my home to the Wynnum Manly Yacht club, where its parking spot was waiting.

Launch day was fun, if I draw a discrete blank over my attempts to get the mast up in the morning. A few friends and family joined us at the Wynnum Manly Boat ramp as the Reverend Jim Stonier blessed the boat, and my wife named it. I named it Sandpiper, after the Mirror dinghy that I had build with my dad as a teenager. That boat finally fell to pieces, and I kept one of the gudgeons as a memento. This boat was of a far superior quality. After the formalities, I took some of the guests and their kids on a brief circuit in the marina. In launching and retrieving I made the obligatory rookie errors, but I am glad to report that no one actually died.

Naming the boat

First launch into Moreton Bay

Episode 41 Tallying up the costs

How much does it cost to own a boat?

The question is often asked by folks interested in buying a boat, but not having any experience of owning one. It is, of course, impossible to answer definitively, but it is possible to conjure up a working budget. This post is intended for the prospective boat-buyer as he or she ponders the possibility buying and maintaining a first boat.

My limited experience tells me that the more expensive unknowns are not what many prospective boat-owners think. The costs van vary widely, depending on whether the thing that is bought is really appropriate for the task that it is bought for. Also, it really helps if you know who to turn to to get what you need, be it someone who can do boat electrics, or someone who knows how to service marine diesel engines. The mounting costs of these two issues alone prompted me to part ways with Bolero, but a more experienced or connected owner might have successfully rescued the situation for fewer dollars (and I truly hope that was the case with Bolero’s new owner). 

The harsh reality is that boats do indeed reach the end of their serviceable lives and it is worth lodging the fact immovably in one’s field of view when presented with a seemingly irresistible deal on an old boat. End-of-life occurs in a kind of mythical parallel time-space continuum that has some vague connection to the one inhabited by our boats. Theoretically, it occurs when the work required greatly outweighs the value of the boat but it commonly gets shunted back into its parallel universe by as much sentiment as much as putting the old family dog to sleep. 

Many GRP boats are now 30 to 40 years old. Contrary to the promises of vendors and agents, they are not indestructible, and the problems begin to compound, especially when subjected to the kind of cack-handed maintenance that I lavished on my boat following, it seems, the tradition of most of its previous owners. Such abuse became apparent in the myriad of different size screws and screw-head-types that were holding the windows to the hull, as if one of the previous owners had a jar of every screw that had been left over from every DIY job imaginable and then used a random-number generator to select them for insertion into the holes in the window frame that, incidentally, were widening at different rates according to the level of contact between the dissimilar metals of the aluminium frames and steel screws. The rats’ nest of wiring, where some wires were simply twisted together and covered with self-adhesive insulation tape was, frankly, jaw-dropping. I was willing to sort through the 12-volt electrics, but it would have been another project on top of all the other projects that could have occupied all my weekends for the rest of my days on earth. I was grateful that the new owner took the boat off my hands knowing the scale of the work ahead of him.

The following table has a rough tally of dollar costs that I spent in owning Bolero. I trust it might be useful as a guide to how much it costs to own a 40-year-old 28-foot sailing boat. I am sure I missed some items, like the the anti-fouling and repair to the rudder. My sums worked out at a little under AUS$1000 per month, which sees a reasonable working estimate budget for someone considering a boat of a similar size and age. There is no such thing as a cheap boat.


Date Cost Description
Oct 2019 $20,000 Initial purchase
Oct 2019 $685 Surveyor's fee
Jan 2019 $1,940 Slipping
Oct 2019 $2,647 Marina fee
Oct 2019 $2,704 Batteries, propellor, depth sounder, slipping
Aug 2020 $365 Boat registration
Aug 2020 $80 VMR Marine Assist
Aug 2020 $513 Yacht club fee
Aug 2020 $605 Repair to boom bag, replace anchor chain and mainsail halyard
Aug 2020 $780 Insurance
Feb 2021 $704 Sundry parts for Bukh Diesel Engine
Aug 2021 $2,762 Marina fee
Aug 2021 $565 Yacht club fee
Oct 2021 $307 Upgrades for category rating for St Helena Cup
Nov 2021 $929 Sundry parts for Bukh Diesel Engine
Dec 2021 $3,410 Recondition Bukh Diesel Engine
Dec 2021 $689 Replacement engine exhaust elbow, thermostat, misc parts
Jan 2022 $597 Make a new engine bay floor
Aug 2022 $555 Yacht club fee
Aug 2022 $12,000 Gross sale price
Aug 2022 $4,400 Agent's commission, including GST
Aug 2022 $7,600 Net sale price
Total costs $40,837
Net costs $32,837
Number of months 35
Cost per month $953

Episode 40 Conceding Defeat

The long and short of it

I have conceded defeat in my struggle with the Bukh DV10 LME diesel engine. The long story is told below, but the short story is that I ran out of time and energy. I could add money to the equation; it became a case of throwing good money after bad. Sometimes you just have to walk away.

In my last blog, I thought I had got to the end of the mechanicals and could start on the electricals (I had started to remove the crappy wiring and damaged switches). I was wrong. The engine refused to start. It had started in the workshop, but enough had happened between the workshop and boat to make it not start. Eventually, I found out that the problem was related to an eccentric bolt, which I should not have removed and replaced.

Despite offering money, I could not persuade the workshop mechanics to come to the boat to inspect the engine. They might have spotted something simple (in the end, they did) but it meant another afternoon of borrowing time from my son-in-law and his dad to get the engine out, another trip to the workshop in Loganholme, another wait while they got round to it, another $300 to adjust a bolt, and yet another afternoon of in-laws’ time to get the engine back in again.

Before getting the engine back in, I thought I would be clever by removing the 16kg flywheel to lighten the loads. Because it was so difficult to remove, I made a pulling jig, which damaged the copper winding on the already defunct generator inside the flywheel. Trying to be clever again, I applied some anti-seizing goo to the flywheel taper to make it easier to remove in future, which was a BIG mistake. I found, after the event, that the reason that the flywheel was so difficult to remove is that it relies on the friction between the flywheel and taper to hold it in place.

So, I finally got the engine in, connected the wires to the new starter battery that I had bought for the occasion and fired it up. It actually started … for about 10 seconds, died and refused to re-start.

Examining the video of what should have been a triumphant moment, I saw that the flywheel was slipping on the taper. I found that it had sheared the taper key, scored the taper and, worst of all,  a crack appeared in the flywheel on female surface of the taper.

That crack was the end of the engine. There was no way back from this, even if I managed to repair the taper and key. A repair to the taper would have needed complete disassembly of the engine and a return to the beginning, which would not have been worth it.

The engine was dead, the electrical switchgear had been pulled out, my boat was going nowhere. At a rough guess, I reckoned on spending another $15K and every weekend from now to Christmas to get the boat functional. Depending on market conditions and condition, I expected sale price of $20K to $30K for a fully functional boat. Circumstances at home demanded my weekends, work demanded my weeks, and there was no realistic possibility to spend the time needed on repairs. I decided to sell the boat, as is, where is. 

I sold it through an agent for a total of $12K. The agent took his cut (I’m not complaining as it was part of the deal), which put about $7600 in my pocket. The loss in value plus the lost costs on the engine rebuild amounted to about $20K. When asked whether I got what I wanted for the boat, I replied that I did, because I got peace of mind at a time when I needed it most. 

I should add that I am not optimistic about the used-boat market. With the easing of COVID restrictions, more people are likely to spend their money on travelling than COVID-toys such as boats. Also, the difficulty of disposing of end-of-life boats means that there will be a growing pool of 30 to 40 year old boats with indestructible GRP hulls that are riddled with problems to do with engines, wiring, leaking decks, broken fittings etc. etc. The growth of supply could outpace demand, which means that we are likely to see more hulks rotting on their moorings, and that will reduce the sale-value of the remaining functional and well-kept boats. 

The buyer was a boat designer and builder, who had the necessary parts and connections to fix up the boat, especially a functioning, used engine.

Lessons learned

I have learned a lot about diesel engines. The primary lesson, which has been costly, is to beware of rare and exotic engines. My Bukh DV10 LME fell into this category. It is much more difficult that you might imagine to get a mechanic interested in fixing one. Why should they invite trouble to their workshops, when they have a steady stream of the more common brands, such as Volvo, Yanmar, Nanni, Beta? 

Getting parts for rare and exotic engines is difficult and expensive. In my case, I had to pay $700 for the gaskets and about the same for a new exhaust elbow, which took weeks to arrive by post from New Zealand. 

Also beware of mechanics who do not know about your particular engine, or even about marine engines. I was alarmed at the information I needed to feed to my mechanic, such as the torque settings for the engine block bolts. I did not realise how valuable a detailed manual would become, or how much the mechanic would need to rely on one.

In conclusion

The Cavalier 28 is ideal for day-sails in Moreton Bay and hops up and down the coast for one to four persons on board. It is spacious and races well, especially with a folding propellor. Its racing pedigree was a major consideration for the new owner. Ultimately, though, it was the condition of the boat that finally killed it for me. I got sick of the shoddy workmanship and cowboy maintenance. Every new problem that surfaced added to my wife’s worries, which would have spoiled our enjoyment when, and if, I got the thing sailing again.

I will get back on the water gain, but not with something that has more fixing than sailing.


Episode 39 Diesel Engine Part 10 The End of the Mechanicals and the Start of the Electricals

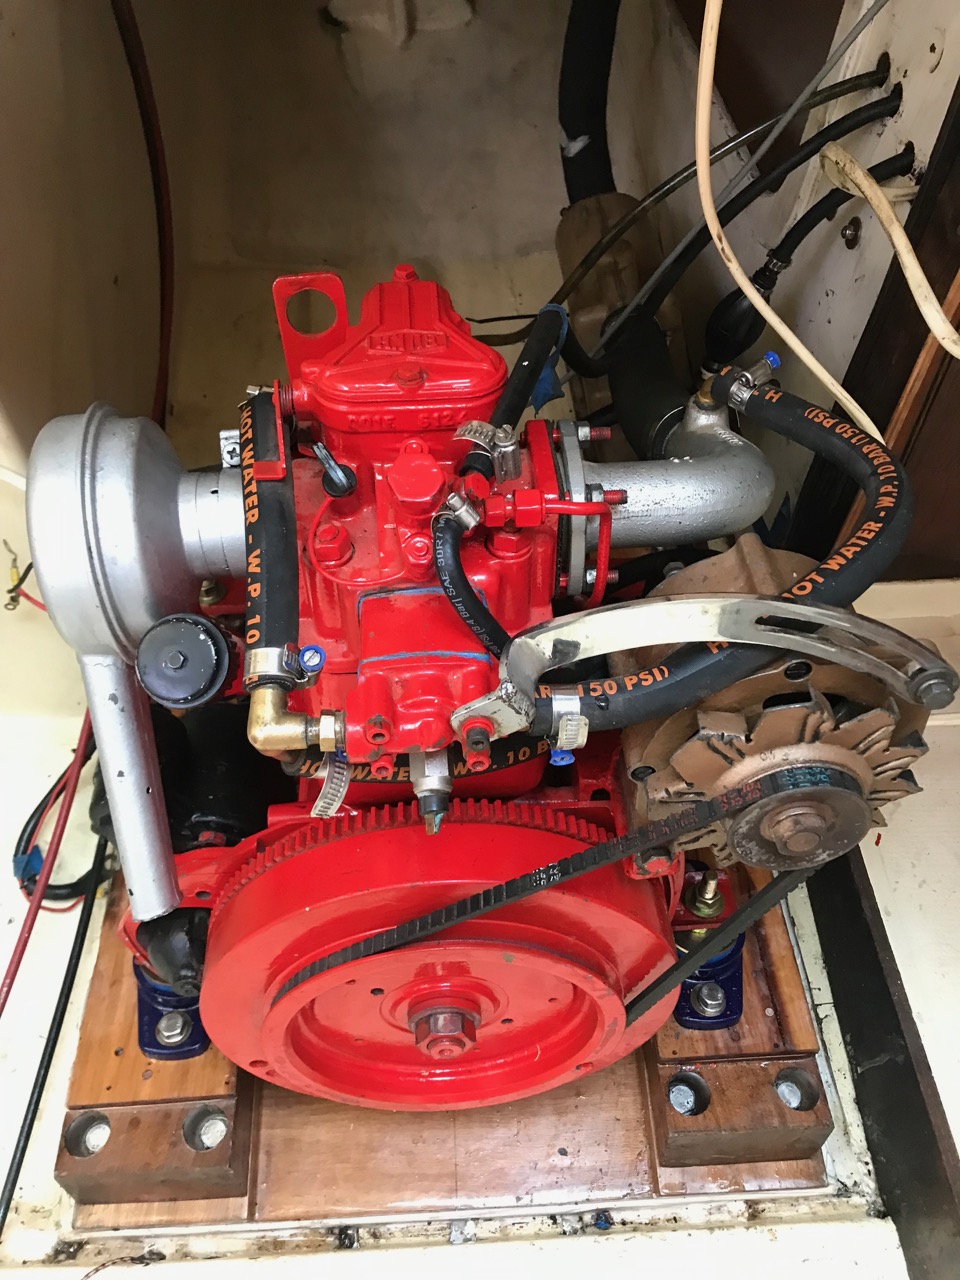
My resistance to my inner perfectionist, by not shaving the tops off the engine beds, did not last long. I plead extenuating circumstances, which were brought about by the exhaust hose.

The exhaust hose comprises a section from the engine block to the muffler and a section from the muffler to the vent hole in the transom. The muffler must be secured at a lower level than the engine block, because it traps water. If the muffler were higher than the engine, this water could run down into the engine block, rusting the pistons and seizing them. The water trap muffles the noise of the exhaust, and also hinders water from a rogue wave posing water back up the exhaust hose, towards the engine. Ideally, the boat should have a short section of exhaust hose going down from the engine to the muffler, and another, longer, section running up from the muffler to a high point under the cockpit, before exiting through the transom. The high point under the cockpit drains the hose, in case water gets into it. The shorter the exhaust hose, the less water the engine needs to push out, if the exhaust hose gets flooded.


The previous arrangement was awkward, having too much hose and the muffler placed loosely on the floor. The only thing holding the muffler in place was the stiffness of the exhaust hose. Being aft of the engine, it was in a space that is inaccessible to anyone who was neither a dwarf nor a person with six foot extensions to his or her arms. I tried to make the necessary adjustments by reaching over the engine, or wriggling through into the space behind (it was almost impossible to wriggle out again). The required boat-yoga was physically exhaustion and the refitting and fixing the exhaust hose proved difficult and unsatisfactory. In the end, I decided to undo all the bolts and take the engine off its mounts, again. 


Having taken the engine off its mounts, I succumbed to my inner perfectionist, took the beds home and shaved off about 12m from the upper surfaces. Now that my hand-plane was razor sharp, this was easier than I had feared. I figured that the rear bearings were wound down to the stops, and the flange plates only just mated, which meant that something was rubbing on something else in the prop-shaft tube. I needed to drop the engine by about 5mm.


I swabbed out the engine bay, again, thinking that this might be the last clean it gets for a very long time, and set about cutting and fixing the hose. The rear part the hose was stiff and reinforced with steel wire, which I did not know until I started to cut it with a hacksaw. The steel wire also explained why I could not push it back onto the spigot on the muffler box. The spigot had an external diameter of 40mm and the hose an internal diameter of 38mm. Brute force would not get them to mate. A spade drill applied to the inside of the hose to ream it out did the trick. The loose ends were secured with hose clamps and the hoses and muffler box were secured with clamps and cable ties. In all, I shortened the rear hose by about one meter, and the forward hose by about 0.5m. 


Again, I re-assembled the beds and re-mounted the engine. This, I know, would not be the last time. Gratifyingly, the flange plates met somewhere in the middle of the prop-shaft tube. I had wound the rear bearings up by about 5mm, the reduction of the bed tops and this adjustment giving me the 5mm I was looking for. I adjusted the forward bearings until the feeler gauge told me that the prop-shaft flange and engine flange were parallel and in line. 


The reconnection of all the fuel and water hose lines marked the beginning of the end for the mechanical phase and the start of the start of the electrical phase.


I had been procrastinating on the electricals whilst I was sorting the mechanicals. My first engagement was to jury-rig a spare battery to the engine in an attempt to start it. The battery achieved about an eighth of a turn before giving up, needing a considerable recharge, but the exercise demonstrated that the starter motor and solenoid were in working order, but the electrical system in the boat was not.


The two factors that condemned the electrical system were the accumulation of poor initial design, consequent bodge-jobs and quick fixes that culminated in the current rats' nest of wiring, and the episode in which the leak in the shaft seal submerged the inside of the boat to about a foot of sea water. The flooding of the boat did not affect every electrical system on the boat, but, the many switches located near the floor were damaged.  I found a tide-mark on one of the batteries showing that the water stopped just a couple of inches below the terminals. The arrangement of switchgear at floor level was a design fault that was pointed out by my surveyor when I bought the boat, together with the absence of anything to hold down the batteries. Also, after spending countless hours baling out water from the bilges, I thought it was time to indulge in an automatic bilge pump.


My intent is to relocate all the switch gear to a new box that will be mounted at about head-height on the bulkhead to starboard of the companionway. This will do several things, including the prevention of further seawater leaks ruining low-lying switchgear. It will make the job of re-wiring the boat much more pleasant, as I will be able to see what I need to do at head-height. It will make the switches much more accessible, and it will provide a protected cavity for the backs of instruments mounted on the bulkhead. Further advantages include improved accessibility to the engine stop-start switches and anchor windlass from the companionway and, possibly, providing a mounting point for instrument panels that I might want to mount on hinges in the companionway (e.g., a monitor screen for a navigation computer). In any case, I like having switches and other electrical items stowed inside the boat when not in use, to protect it from the weather.


Other than getting the engine to start and stop at the flick of a button, the next steps are to learn 12V boat electrics.


Removing about 12mm from the tops of the engine beds

Planing the tops of the engine beds. This exposed several redundant holes that I had drilled in the undersides as part of the assembly process, which I then filled with epoxy resin.

Re-assembled engine

Checking clearances - starboard forward bearing

Checking clearances - port forward bearing

Checking clearances - starboard rear bearing

Checking clearances - port rear bearing

New exhaust hose arrangement, from engine block elbow (silver colour) to muffler box (brown plastic) to high point under cockpit floor to exit at transom (at rear of boat, not visible)

Current electrics around battery terminals

Tide mark on battery terminal showing how high the water got when the flange seal leaked.


Episode 38 Diesel Engine Part 9 - Multi-Mega-Monster Milestone as the Engine Goes Back Into the Boat

Have you ever been in the situation where you need to do A, but find that before you do A, you need to do B? Then, C gets into the queue, just before D and E. Before you know it, you have back-tracked to the end of the alphabet. Your return from Z is delayed by several dead-ends, and you must have gone round in circles somewhere near L, M and N. With fortitude, you press on until, finally, A pokes its head above the horizon to give you renewed hope. 

To recap, this whole project was triggered by a fuel leak. That prompted a reconsideration of the engine, which led to its removal and reconditioning. When the engine was removed, the beds were discovered to be in a shocking state, which led to their removal and a slow reconstruction in one of the most geometrically challenging tasks I have ever undertaken. Now, Hallelujah, the new beds are in and the engine is safely bolted to them in (almost) perfect alignment. 

In my last blog I described my initiation into wood-working as I cut and shaped the new beds from scrap timber. I took my newly-cut beds to my mate James, to drill the holes for the holding-down bolts with a drill press (not having one of my own). James is more of a heavy-engineering type, than, say, Naman, who is more of a fine-furniture type. Whereas you would go to Naman for a beautiful cabinet or table, you would go to James for a cyclone shelter. While James kindly drilled the holes, I reconsidered the upper surfaces of my beds, which were about 3mm out of true. 

The perfectionist in me decided to build a jig from the extruded aluminium sections from Bunnings. These sections could accurately set out the 75mm step and get things in parallel in my new jig. I employed my new-found planing skills to flatten another plank that I had bought from the Demolition Yard for $9, and then cut out new pads for each of the four engine-bearing-bearing-surfaces. I then attached the pads to the jig and epoxy-glued them to the bearing wedges, with the help of some thinner strips to fill the larger gaps. My new batch of Norglass epoxy set nicely, unlike the dregs from the old batch. 

After some more planing, I coated the finished assembly with a layer of clear epoxy resin as a barrier-coat. Like the floor plate, I have decided on a clear finish, through which I should be able to see any rot or other problems, if they ever develop. 

If nothing else, the construction of the floor plate and bed has given me the confidence to tackle demanding wood-working jobs with little more than a power-drill, a hand-place, some epoxy resin and a bag of dowels. Keeping metal fixings out of the body of the timber is obligatory because, chances are, you will probably saw or drill into them at some point. 

I recruited Ryan and Mark, my son-in-law and his dad, to lift the engine back into the boat. This was easier than taking it out because I had stripped off the 16 kg flywheel and about 17kg of other peripherals, such as the starter motor, alternator, stopper-solenoid and exhaust elbow. Prior to the engine-lift, I had constructed an aluminium lifting beam that fitted snugly onto the slider-tracks for the companionway cover. To this I attached a lifting strop and chain-hoist so that I could manoeuvre the heavy engine after Mark and Ryan had gone home. The lifting-beam proved its worth in the following days as I lifted the engine into place several times, only to remove it again to make an adjustment to the beds. 

In a prime example of going round in circles in the middle of the alphabet, I found that the holes I had drilled the day before had to be filled with epoxy, because they put the beds about 10mm too far forward, leaving insufficient clearance between a cut-out and the fuel pump assembly. These adjustments were too awkward to be made with a power-saw and, in each case, I lifted out the engine, un-bolted the engine beds and took to them with a hand-saw at a work-bench. 

Finally, after much jiggling and wiggling, I got the engine into the right place horizontally. I adjusted the height of the bearings to get the flange on the gear box to mate with the flange on the drive shaft. It was better to check the clearances between the two steel flanges, than with the more elastic polymer of the 20mm thick Polyflex coupling. To get it to line up, I needed to wind the rear bearings down to the stops, and raised the drive shaft a few millimetres in the shaft tube. The result is that the drive shaft is a little high in the tube (hence my earlier comment about the alignment being ‘almost perfect’), but the tolerances should be OK. I resisted the perfectionist in me that would have otherwise told me to plane down the beds by about 10mm, lifting the engine out one more time and fitted the Polyflex coupling before sliding it into place. 

Importantly, with our without the Polyflex coupling, the clearances around the engine sump and fuel pump were good, being enough to get my fingers around all the protruding bits and pieces. This was the first real test of all my measuring, jig-making, cutting and planing, and I was truly grateful that it all worked. 

The beds were bolted onto the floor plate with 65mm M12 stainless steel coach bolts, six per bed or twelve in total. The engine bearings were bolted onto the beds with 50mm M10 stainless steel coach bolts, two per bearing, or eight in total. I pre-drilled the holes for the bolts, to the diameter of the bolt-shafts, which were 8.5mm and 7.0mm for the M12 and M10 bolts respectively. Drilling these holes was a challenge, because Bunnings had a limited selection of Brad Point or auger drill bits. These types of bits cut around the circumference of the hole first, reducing the kind of tear-out you would get with a normal twist-bit. 

The auger I had bought had a tapered point, which was designed to bury it into the timber at a surprisingly rapid rate. I had to be careful not to drill it all the way through the hull, which would have joined the inside of the boat directly to the sea, with predictably disastrous consequences. 

My strategy was to cut the main hole with an undersized Brad Point bit or auger, and then to ream it out with a twist drill of the right size. A couple of hours crouching over the coach bolts with a ratchet-socket wrench in the engine bay made me feel like I had just spent a significant session on a rowing-machine in a gym, with the sweat to prove it. 

I have yet to replace the peripherals and to connect the wiring, fuel and water hoses. However, these should proceed without much more worry, because the engine is now back in place, and the new beds fit.

A is now hull-up.

Using the jig to epoxy-glue bearing pads to the engine beds

Using the jig to check the clearances under the engine

The engine, on its way into the boat

Insufficient clearance between the fuel pump and the engine-bed cut-out, which needs further adjustments to the bed, and its location on the floor plate

Lifting beam assembly, which proved its worth in the many times the engine was lifted in and out of the engine bay, whilst it was fitted.

Clearance under the engine sump

After adjustment, the clearance to the fuel pump is good

Checking the rear-port bearing before drilling the fixing-holes for the holding-down coach bolts

Checking the forward port bearing before drilling the fixing-holes for the holding-down coach bolts

Checking the forward-starboard bearing before drilling the fixing-holes for the holding-down coach bolts

Checking the rear-starboard bearing before drilling the fixing-holes for the holding-down coach bolts

Engine in place and bolted down

Engine in place and bolted down

Engine in place and bolted down, showing the coupling to the drive shaft at the rear .


Episode 37 Diesel Engine Part 8 - Glue Fail

My epoxy glue failed. 

I had cut my new beds in four pieces from 48mm Merbau timber, and glued them in pairs to form two beds, both 96mm wide, using Norglass Epoxy resin. I noticed that something was wrong a few hours after gluing because the excess epoxy resin still felt liquid-soft. After a week, it had lost its tackiness, but was still soft enough for me to indent it with a fingernail. Worse, I could scrape off the excess epoxy resin with a paint scraper, and roll the excess into a ball with my fingers. Finally, I cut of the end and found that the joint was not difficult to break, leaving the timber in tact. Whatever the breaking strain of the glue in the joint, the epoxy was weaker than the timber, which was unacceptable.


I tested a sample of the remaining resin and hardener, and found that it would not set. My best guess is that during the pour for the floor plate, I exposed the bottles of the resin and hardener to the sun, which had done something bad to the chemistry. Thankfully, the resin for the floor plate in the boat had set as solid as a rock, and it had consumed nearly all of the 6 litre pack that I had bought. I was using what was left, thinking that it was OK.


This was an inconvenient set-back, but not as inconvenient as, say, the beds disintegrating at sea. Rather than risk my newly constructed beds, or try to fix them up with bolts or screws, I decided to throw them out. I had lost about $120 for the timber, about a day’s work and a week of elapsed time.


The new, new beds would be constructed from a single piece of timber, but the only convenient source of suitably sized and priced timber was the Demolition Yard, nearby. I selected a 120mm x 120mm square post, 1.5m long, paid $30, and got to work. I don’t exactly know what timber it was, only that it had been classified as “hardwood”. I do know, however, that it had already had a lifetime of seasoning, unlike much of the new timber in the yards.


The first job was to scrape off the old paint by hand. Although this was physically demanding and slow, I could check all the surfaces for any remaining nails or screws (I found the remains of one nail). I could also get a feel for where the splits, knots and soft timber lay. 


My templates and failed Merbau beds were put to use to find the best orientation for the new beds, and the setting-out of the long cuts. My circular saw cuts to a depth of 63mm, so the long cuts were made by cutting in from both sides to the half-way mark. About half the cuts met in the middle, and half did not. I used my reciprocating saw to clean out the connected cuts, and to connect the unconnected cuts. Although the reciprocating saw can cut through thick timber (the thickness depends on the length of the removable saw-blade) it has almost no directional control, which is why I needed the circular saw-cuts as a guide. In hindsight, it would have been better to take the timber to someone with a band-saw. 


For the short cuts, I used my newly acquired Bahco tenon saw, which, at about $50, was the most expensive on the rack at the hardware store. My previous tenon saw was cheaper, but had a tendency to wander off line and bind.


The next step was to clean up the timber with a plane. I had previously bought a hand plane at a closing-down sale, but knew little about how to sharpen the blade or set it up. The YouTube channel Third Coast Craftsman was an education, which was followed by a lengthy on-line search to find a real bricks-and-mortar shop nearby that would sell me a sharpening jig. It took considerable effort to persuade Google that I was not in search of an expensive power plane, and eventually found the desired item in the Carbatec shop in Wakerley. I went in with the intent of buying a $20 sharpening jig, and came out with the sharpening jig, sharpening stones and a strop, all for about $130.


The sharpening gear made a huge difference to my hand-planing. I could not quite get to the consistent waxy-smooth finish, or the uninterrupted whooshing sound of a perfectly formed shaving being parted from the parent timber that is featured on so many on-line videos. I did, at least, get away from the juddering, ripping and gouging of my previous attempts, much to the relief of my wife, who had hitherto tolerated my house-shaking planing with remarkable fortitude. 


The steps in the timber beds complicated the working of the lower steps, and accounted for some of the skin on my knuckles. However, the “free” surfaces on the bottom, sides and top, came up nicely. I know that these are only engine beds, destined to lie hidden under the diesel engine, but I found immense satisfaction seeing the beautiful patterns of the grain emerge in a way that cannot be done through sanding.


My saw-cuts and consequent trimming were not as accurate as I would have liked. There are still small differences in angle and depth, but they amount to less than 3mm from one bed to another, or from one end to another, which is probably OK. The only remedies I can think of are to clamp the two beds together and work over them with an accurate bandsaw, or a table saw, or a router in a frame, none of which are available to me.


Further rough dry-fitting confirms that the beds are good to go, and I am back at the stage where I need to drill the holes for the coach-bolts to bolt the new beds to the floor plate. For this I will need a pillar drill, or drill press, which means further calls on my mates.


Failed epoxy resin glue joint - the glue should be stronger than the timber

Scraping old paint off the 120mm x 120mm recycled timber post


The hazards of recycled timber. In this case, the pointy end of a mild steel nail

New beds, rough cut. Clearly visible are the joins where the cuts from both sides had not met in the middle.


New beds after much planing. The mitre in the port side bed (the far side) is a cut-out for the water pump on the Diesel engine. The thick and thin ends of the wedges still need to be trimmed.


Preliminary dry fitting of port (larboard) bed. The thin piece of timber in the middle of the floor plate, stuck into one of the holes in the shaft flange, is a strut intended to keep some pressure on the drive shaft so that the seal does not leak as it did previously.


Preliminary dry-fitting of starboard bed


Episode 53 Corner Blocks

 This was probably the most complex piece of wood-working I have carried out on my Cygnet 20. I had previously made up some corner-blocks, w...