Episode 29 Depth Gauge

Bolero's depth gauge decided to not gauge the depth after getting back into the water from her January slip.

To be fair, the depth gauge unit was Navman Multi 3100 with an LCD screen, about 15 years' old. It did everything else nicely, including a read out of the battery voltage, but as it had given up the ghost in its chief purpose of gauging depth, it had to go.

Being a cheapskate, I looked for the cheapest working alternative. I wanted an in-hull fitting, because I don't like the idea of putting holes into the hull (or bulkheads) and because I did not want to slip the boat again, at $350 a pop at least, to fit a new instrument. For me, the most important thing was a reliable reading of depth in water shallower than about 2m so that I would not run aground, and so that I would know how much anchor chain to let out when needed.

Having succeeded in fitting a Lowrance Hook 2 5x to the inside of the hull of my Austral 20, I decided to downgrade to a Lowrance Hook 2 4x with GPS for my Cavalier 28, which had a similar solid GRP hull, although much thicker. The unit cost about $160. With my Austral 20, I simply glued the bullet to a puddle of epoxy resin in the bilge, and it worked nicely to give depth readings. 

One feature I like is that you can mount the head unit on a bracket screwed onto a bulkhead, so that it can be easily removed and stowed inside when the boat is unattended. This also saves having to cut a large new hole into the bulkhead, which not only weakens the structure but also presents another opportunity for water to get into the boat.

Initially, the 4x would not give a reliable reading of depth. To be fair on the Lowrance Hook 2 range, the transducers or bullets are designed to be mounted in the water on a bracket on the back of the transom as fish-finders. I was mounting mine inside the hull, and I was not interested in fish as much as the depth to the bottom, especially in shallow water. 

I had glued my bullet with FixTech 180 to the bilge a little forward of the previous and now-redundant through-hull fittings. The 4x gave some readings, but proved to be unreliable. The shallow-water alarm went off in the middle of the channel near Peel Island, which is maybe 8m to 10m deep. Thinking I might have mounted the bullet over some obstruction in the hull construction, I prised it off, damaging it in the process, and tried blue-tacking it into several alternative locations. With the blue-tack, the depth readings disappeared entirely and I thought I might have bought a dud.

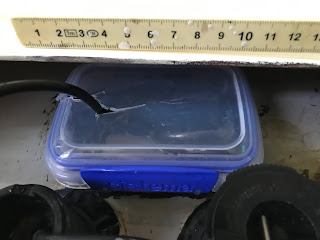
I phoned the shop I bought it from, Boating and RV in Tingalpa. Richard suggested I make a wet well inside the boat into which I should place the bullet. He suggested PVC pipe with a screw-on end, but I opted for cutting the bottom off an old Sistema clip-top food container and fixing it to the hull with FixTech 180. The clip-on top was needed to keep some water in the wet well when the boat heeled, and there was precious little room in the bilge for a larger screw-top arrangement.

I am happy to report that the wet well approach works well, and I got a nice, steady reading of a depth of 2.2m at my berth, which is what I expected (allowing for the bullet being about 0.3m to 0.5m below the waterline - I'll have to measure it more accurately). It also showed some fish, which were in no danger of being hunted by me at the time. 

So, to recap, you can use a Hook2 4x Fishfinder as an in-hull depth gauge subject to two important conditions;
  1. The hull you are shooting through is solid GRP construction, not a core-filled sandwich
  2. The bullet is placed inside a wet well inside the hull, which you will have to make, including a lid to keep the water in. A food container or sandwich box with a sealable lid will do nicely
The end result is ugly and agricultural. The plastic food container was more difficult to cut than I had anticipated. However, as we engineers say, "If it is stupid and it works, its not stupid".


Sistema food container with bottom cut off, glued to hull with FixTech 180
Wet well filled with water, bullet inserted and lid on (the lid needs to be sealed properly)

Depth gauge reading on head. Not easy to read in direct sunlight, but the head can be tilted down on its bracket.


Episode 28 Leaky Windows

In February, we were still expecting to go on our Big Trip through Canada, and across the Altantic to the UK. Since then, the COVID-19 crisis took hold and all our plans went south. However, at the time, I was expecting to leave the boat mostly unattended for 3 months, so decided to fix the windows to stop the rain coming in.

Bolero does not have a bilge pump. There is little clearance, only about four inches or 10cm, between the cabin sole (the floor that you stand on) and the bilge (the inside face of the hull), so there is not much room to fit a bilge pump. In any case, I think it is better to keep the water out, than to attempt to remove it once it is in by an electrical contraption that is doomed to fail at some point. Also, if I can see how much water is coming in, I can determine whether there is a leak worthy of my attention.

Bolero's windows had been leaking, and various previous attempts had been made at repairs, which was evident from the uneven application of silicon goo  and the odd-sizes of screw-heads used to fasten the window-frames to the cabin roof, including a couple of countersunk and oversized cross-head screws. The only way to find out how the things were constructed was to pull them apart, so I started by prising off the forward starboard window, which had been one of the leakiest.

Forward starboard window before repair

I found that the windows were constructed in two parts; the outer frame with the glass, which was screwed onto the outer wall of the cabin, and a simpler, inner frame which was screwed onto the inside face of the outer frame, thus clamping the headliner or inner lining of the cabin roof into place. The strength of the fit therefore depended on the strength of the purchase between the screws in the inner frame and the screw holes in the outer frame. Over time, most of the screws had worn out their holes, Galvanic reactions had reduced the aluminium into a white powder and many screws had become loose. The previous repairs had attempted to deal with the enlargement of the screw-holes by using larger and larger screws, which was obviously unsustainable.

Having got one of the windows off, the first job was to clean off all the old goo. The best approach was a wire brush. This got down to the bare aluminium and revealed the extent of the pitting and loss of metal at the screw holes. I filled the screw holes with JB weld and re-drilled them before repainting the frames. For painting, I used Dulux metal etch primer and epoxy enamel. It took me several attempts to get a presentable finish. Next time, I would use a pot and brush, not a spray can.

Before and after cleaning the goo off the outer frame
Close-up of pitting at screw-hole and attempted JB weld repair

Making a gasket for the outer frame with 1.5mm thick rubber strip glued into place with black Fixtech 180

Re-fitting the windows took several attempts, too. I made gaskets for each window using 1.5mm x 16mm black rubber strip from the Big Green Hardware Store, fixed into place with black FixTech 180.

Initially, I tried to re-screw the two frames back into place, but the screws did not get enough purchase into the GRP hull and aluminium frames for a strong joint. The inner frames were a little smaller than the outer frames, but there was sufficient metal to drill through, at an angle, from the outer screw-holes to the inner frame for a through-bolt. The resulting protrusion of bolts on the inside face reminded me of the bolts in the neck of the cartoon character version of Frankenstein's monster, but it was a strong joint. I might even use some of the protruding bolts to fix brackets for curtains. Also, I found that my rubber gasket was too thin, leaving some big gaps between the outer frame an hull. I doubled the thickness of the gaskets by adding another strip, and then attempted a dry-joint, which leaked when subject to a garden hose test.

There were a couple of things that I tried that did not work. In an attempt to arrest the Galvanic reaction between the aluminium frames and stainless steel bolts, I coated the latter with Duralac. However, the end result was plenty of yellow cake that stood out proudly against the freshly painted black frames. Ultimately, I cleaned it off and used nylon washers instead; there would still be some aluminium to steel contact, but not as much as otherwise and in less visible places. Also, I initially tightened the bolts with my impact driver. Impact drivers are good for getting seized bolts out, but they over-stressed my bolts when I put them back in, bending several where the nut or head had not seated evenly on the frame. I finally tightened the bolts gently by hand, which left a little for further tightening if needed. Placing and tightening the bolts was a two person job, and my wife patiently helped by holding the spanner on the nuts inside the boat whilst I got to work on the dome-heads outside the boat with my screwdriver.

In an attempt to seal the gap between the gaskets and hull I initially thought of using silicon grease. However, the dolt at the shop sold me silicon bathroom sealant instead, and I only noticed when I had applied it and it had started to harden. I did what I could to get it off again.I hate silicon bathroom sealant on boats - it is not strong enough to hold anything, there is nothing you can do to it after it has set, it is too yielding to remove easily with a knife or scraper and is impervious to chemical attack. That's why I use proper alternatives such as Sikaflex and the FixTech Range. The latter has a purpose-built clear UV resistant sealant, which worked well to fill my gaps.

It took a surprising amount of time to get the windows back in, from February to April, including several trips to the bolt shop by my wife to replenish my stock of bolts, washers and nuts and several attempts to re-paint the frames. When the final hose-test revealed no leaks, my long-suffering wife and I gave a relieved cheer. Subject to the COVID-19 travel restrictions, we could finally take the boat out again for the first time since slipping it in January.

Windows after replacement, starboard side
Windows after replacement, starboard side before placing dome-head nuts on the protruding bolt-ends

Episode 27 Broken Rudder

About a week before slipping the boat to replace the wobby prop, I decided to take some mates out on Moreton Bay with a view to getting a crew together for some races.

About half way between Green Island and Peel Island my mate on the helm told me that he had lost the steering. As you can imagine, this was quite a serious occurrence, and further inspection revealed that the rudder had broken about half way between the upper and lower pintles (the two hinges that connect the rudder to the transom). I called the Volunteer Marine Coast Guard on Marine Assist to inform them that we were having difficulties and then had a look. Fortunately, although the rudder had split, it had not completely parted at the break. There was enough material remaining on the rudder to allow us to lash the two halves together, rather like splinting a broken limb (I have never splinted a broken limb, but I have done some First Aid training). Although the top and bottom parts of the rudder wobbled in alarmingly independent directions, the whole had enough integrity to allow us to point the boat in the right direction. We limped back to Huybers (the marker post north of King Island), and then turned left for Manly Harbour, creeping along at about 3 knots and trying to nurse the boat over the stern-wakes of several stink-boats as they sped by. The prolonged use of the wobbly prop probably exacerbated the damage to the cutlass bearing as mentioned in my previous blog. I kept the Coast Guard informed of our progress, until we had tied up without assistance, and thanked them for keeping watch.

There is no good time to lose your steering, but losing it on a calm, sunny day, with the Coast Guard on watch a couple of weeks before a scheduled slipping is probably the best of a bad situation.

When we had got the boat slipped and the old rudder removed, we found that the timber core had rotted to a black mush. The rotted timber came out as a steady rain of black flakes from the cracks in the casing, which are just visible below the lashings in the photo below. Again, finding this before attempting some racing is better than finding it in the act.

Lashing on broken rudder
After the event, I asked the previous owner, who told me that the owner before him had replaced the original rudder with the bigger one that was now sitting on the back of the boat. The previous previous owner used to sail the boat hard (and had competed in the Brisbane to Gladstone races), and needed the bigger rudder to hold the boat on course. Fortunately for me, he had not thrown away the old, original rudder, which was now sitting under my back deck. 

The bigger rudder was made with a timber core and a GRP outer coat (which had kept it together as we limped back to Manly). Water had got into the core through the holes drilled for the fixing bolts, and the rot had hollowed it out until my mate put a little pressure on it in Moreton Bay. When you see the effect, you realize the importance of properly sealing holes in timber core construction. A good way to do this is to over-drill the hole, fill it with epoxy resin and then drill a hole through the resin at the correct size, thus ensuring that the timber core remains encased in GRP or resin.


Bottom part of broken rudder


Top part of broken rudder (upside down)


However, the finished surface on the original rudder was in poor condition.Because the anti-fouling had been out of the water for many years, it had cracked and degraded into a kind of soot. The gel coat had likewise been gouged and abused. I decided to sand it down, and went to work, perhaps unwisely, with a grinding disc. This proved to be very efficient at removing the old anti-fouling, gel coat and everything else right down to the GRP roving that covered the timber core and I ended up with a naked rudder, with the timber core clearly visible. Although this confirmed the competency of the timber core, it covered everything in my garage with a thick layer of dust to the express dissatisfaction of my wife. Having got the outer layers off, I then paid a yard-hand put them back on again, which he did very nicely. One unforeseen consequence was that the re-coated rudder was thinner than the original, leaving a small gap in the rudder brackets. This was fixed with some white FixTech filler.

Finally, I found that the Cavalier 28 came with two different types of rudders, depending on where they were made. The earlier models were made in New Zealand and had a Spitfire-wing profile. The later models were made in Australia and had the rectangular profile on my boat. The larger, replacement rudder was a one-off. I am quite happy with the original rudder that has now been reinstated. 

I am not sure I will get to the same kind of exertions that led the previous previous owner to fit the larger rudder. In any case, the larger rudder seems to be all about fighting the boat, rather than working with it. I don't have the race experience to make an authoritative judgment, but it seems to me that the energy spent in forcing the boat to do go against its inclinations could be better directed in making it go faster. his is about balancing the boat, as is whole science of itself.

Original rudder, before grinding


Original rudder, after grinding

Original rudder reinstated

Episode 26 Wobbly Prop

The first problem to sort out on Bolero was its wobbly prop. It was an issue that had been pointed out by the previous owner and the Surveyor in the pre-purchase survey. The prop (or propellor) was OK as long as I did not try to take it about 3 or 4 knots, at which point it would try to shake the transom to pieces.

It was an older style flappy-folding prop. Folding props will give you about half a knot over fixed-blade props because their blades fold together when not in use, this streamlining the flow of water and reducing turbulence. Also, they will not spin the shaft when sailing without the motor, which could reduce wear in the seals. The flappy-folders have blades that fold independently on a pivot pin, meaning that one could be up and the other down, as shown in the photo below.

However, folding props wear out, like all props, and can become unbalanced. When they get out of balance, the eccentric forces shake the back of the boat. Not only is this uncomfortable, it will actually damage seals and bearings. When we removed the prop, we found that it had destroyed the cutlass bearing, which is the part sticking out from under the boat just in front of the prop.


Old flappy-folder prop

Because I liked the idea of an extra half-knot, I decided to replace the flappy-folder with a new geared-folding prop. These newer designs have sprocket-teeth on the blades so that they fold symmetrically. They open up with the centripetal force of the spinning shaft, and close under the pressure of water as the boat travels forward. They work in reverse, because the centripetal forces are enough to open the blades against the water pressure, which tries to close them.

There is quite a science to fitting the right prop, including boat size, engine gearing and prop size. I took the advice of David O'Shea at Speed Propulsion and got a Brunton Varifold 2-blade prop, 14 inch diameter. As Murphy would have it, the one-inch drive shaft was a tad too short for the new taper. Apparently, there is now a US standard and a European Standard, but no one manufactures to the old Australian dimensions any more. So, I needed a new drive shaft as well. The prop itself was about $1760, and the labour, shaft, cutlass bearing and assorted bits came to another $1500, or thereabouts.

I got a little worried that the old prop had cracked the hull round the base of the cutlass bearing (where the protrusion meets the hull), but the only cracks I found were cosmetic, due to minor delamination between the GRP hull and bronze cutlass housing. 

I also got a little worried when we put the boat back in the water, and the new seal started to dribble. Left unattended it would have meant a sunk boat. You need to "burp" the seals after slipping by squeezing the air out, then they become dripless. Once I had done this, by means of considerable contortions over the engine block to get to the seal behind, it kept the water out nicely. It seems that one of the tradies had done something similar earlier, because a couple of the electrical wire connections to the engine had been knocked loose. I got them fixed up with some soldering and new spade connections - my first attempt at diesel engine electrics.

New Brunton Varifold Prop


Episode 25 Sold and bought

Having waited long enough to get over that uncertain period when one is vulnerable to buyer's (or selller's ) regret, I felt it was time to update the blog.

Firstly, I sold the Austral 20 in August 2019. I advertised it at $7500K, below its purchase price of  $9000. The price generated several inquiries, and the new owner was one of the first. I am glad  because I had some inquiries in the interim that I did not like. To me, a trailer-sailer is a trailer-sailer, and its chief attribute is its ability to sit on a trailer, out of the water, until needed, for long periods if necessary. You can also drag it to distant places at road-legal speeds rather than plodding up the coast at 6 knots, although I never got to take it on tour. So, when one couple asked if they could buy it and dispose of the trailer, I thought it would be wasted on them. The couple's plan was to leave it in one of the shallow, coastal lagoons up the coast where a retractable keel would be an advantage. Having spent considerable time and effort repairing the swing-keel, I could only imagine the mischief it would get up to, if it were to be left in the water for long periods of time, including the growth of undesirable organisms and rust inside the keelbox.

It was not long before I took the soon-to-be new owner for a test sail. Everything worked as planned, until the MPPT started to emit smoke in the middle of Moreton Bay. First came out white smoke and then black. The isolation switch then failed to isolate, and the smoke kept coming. I said, rather sheepishly but truthfully, "It's never done that before", whilst simultaneously unscrewing the battery terminals and calculating the costs of a replacement, including parts and labour. Graciously, the new owner accepted a $300 discount, rather than the offer of my dubious repair-work. He also took on the lease of the hard-stand at WMYC. I am pleased to say that the boat has not burnt to the ground (it would have been burnt to the water-line, had the other couple got it) and the new owner has taken it off on occasion, hopefully seaward rather than landward.

I then bought my new boat, "Bolero", a Cavalier 28, built in 1983. It was recommended by one of the members at WMYC as a nicely kept boat. The previous owner had to sell because of health issues, but he had sailed it regularly and kept it in good running order. It was a private sale, and we agreed on a price of $20,000, which is a below the advertised prices for other, similar boats. I commissioned a professional survey by Barry Colson (about $650) , which involved a half-slip (bout $350) and a few hours of poking, prodding, tapping and shinging torches into unreachable corners.

Having gone through it, I have to recommend this approach as a good way to buy a used boat. It's different from buying a car. When you buy a car, you might get on the internet, read the reviews, weigh up pros, cons and costs, decide on a model, then search for the best deal from a number of brokers or agents. Its an approach that does not work well with boats, because every one is different. Even if you decide that an Austral 20 or Cavalier 28 is the boat for you, you will find that there are good examples and bad examples, depending on how they have been treated. Many will be inter-state or international, so you would have to commit to a considerable journey just to eyeball the thing. The only way to find out about a boat, is to talk to the previous owners, or people who know the boat's history. The knowledge of the folks at the clubs is so valuable, because many of them know many of the other boats in the club, or in other clubs. The knowledge of the club members is is anecdotal and biased and this is where you need the service of a professional surveyor. My surveyor gave Bolero a good bill of health, and had good things to say about the build-quality, including some reassuring comments about the saddle-bolts used to keep the keel attached to the hull. It seems many modern production boats use only a single-line of bolts to save costs, which could be weaker than the saddle-bolts used in the Cavalier 28. Cheeki Rafiki lost its keel, killing all aboard, and I cannot imagine much worse that can happen at sea.

Buying a used boat within the context of a club or community has further advantages. Soon after purchase, the batteries went flat and would not start the engine, despite prolonged charging from the mains. The previous owner, and another gentleman from the club, fixed up the electrics for free, although I had to buy two new batteries (one starter battery and one house battery) for about $400. The battery merchant offered a 10% discount to club members.

Most importantly, Bolero was sail-able as soon as it was purchased. If there was one piece of advice I'd offer to people seeking their first (or second) boat, it is that they should look for condition, rather than size or make. A boat in good condition means you can sail it straightaway, rather than spending weeks or months fixing stuff before taking it out. There will always be something to fix but, hopefully, it will not be enough to stop you going to sea.


Episode 49 The Ballast Pump and the Boat’s First Hole

 It took about three hours to drill the boat’s first hole.  Not all of that was drilling, of course. There was a lot of measuring, then re-m...